Thursday, September 10, 2015

12. Wasabi and Beer Battered Tofu Tacos with Cabbage-Daikon Radish Slaw and Lime-Avocado Aioli

Yum

As I said in my last taco recipe post, I'm trying to feature a few less-obvious taco fillings before I go back to beef, chicken, etc.  I've made some great progress, but I've got a long way to go before I reach  100 recipes, so I'm trying to rotate the main component of each recipe as much as I can!

I decided to go with tofu this time around.  I wouldn't say that tofu is my favorite food, but I definitely enjoy it.  It's pretty neutral in flavor, but it's not difficult to make it very tasty if you use a great marinade or sauce.

My recipe calls for pressed tofu.  If you've never done this before, it's easy.  Just place the block of tofu on a small plate.  Place another plate on top of it.  Set something slightly heavy (such as a bowl) on the top plate to press on the tofu.  It it's too heavy, you'll smash the tofu, so be careful.  Mine looked like this:


I put a small amount of water in the bowl pictured above to make it a bit heavier.  As the excess liquid is pressed from the tofu, pour it off of the bottom plate.  I usually press tofu for about 30 to 60 minutes.

For this taco, I was inspired by the times when I made a tofu version of fried fish tacos during my eight years as a vegetarian.  I definitely missed fish tacos when I was a vegetarian, but the tofu was pretty amazing!  I discovered that a fish taco is as much about the crunch of the breading, the tang of the lime, and and creaminess of the sauce as it is about the fish.

Are these THOSE tacos?  No.  Of course not.  That would be too easy.  If you've read any of my recipes at all, you know that I just can't leave well enough alone.

I decided to give them an Asian twist.  I don't know if they reminded me of fish tacos quite as much as my previous version, but they were delicious!  Here's the recipe!  :)

Wasabi and Beer Battered Tofu Tacos with Cabbage-Daikon Radish Slaw and Lime-Avocado Aioli

Serves 4 (about 8 to 10 generous tacos)

Ingredients:


For the lime-avocado aioli:

1/2 cup mayonnaise (use vegan if you wish)
1 ripe avocado
1 small clove garlic, chopped
Juice of one lime
1/4 tsp. salt


For the tofu:

1 14 oz. package firm or extra-firm tofu, drained and pressed
1 cup all-purpose flour (with extra for dredging)
About 10 oz. beer (not dark; I used a pilsner)
1 1/2 tbsp. tamari or soy sauce
1 tsp. garlic powder
1 tbsp. prepared wasabi (or more to taste)
1/2 tsp. freshly ground black pepper
Canola oil for frying


For the cabbage-daikon radish slaw:


2 cups shredded cabbage
1 cup peeled and shredded daikon radish
1 small carrot, peeled and grated
3 scallions, sliced
1/4 cup chopped cilantro
1 jalapeƱo, stemmed, seeded, and finely chopped
1 tbsp. canola oil
1 tbsp. rice vinegar
1/2 tsp. kosher salt


8-20 corn tortillas, depending on their size and whether you plan to double them up

Instructions:

1.  Make the aioli:  Place the aioli ingredients in a 2-cup glass liquid measuring cup.  Blend with a hand blender until smooth.  (You can do this in a regular blender or food processor if you wish.)  Taste and adjust seasonings.  Transfer to a small dish.  Cover and set aside.


2.  Prepare the batter for the tofu:  Whisk together flour, beer, tamari, garlic powder, wasabi, and pepper in a medium bowl.  Cover and set aside.


3.  Make the slaw:  Combine all of the slaw ingredients in a medium bowl.  Taste and adjust seasonings.  Set aside.


4.  Cut the tofu into large strips.  I cut mine into about 20 pieces, but if you like a lot of breading on your tofu, you could cut them smaller.  Mine looked like this:  (The plate is a salad plate.)


Pat any excess moisture dry with paper towels.  

5.  Add canola oil to a deep pot until a depth of about 2 inches is reached.  Heat the oil to about 360 degrees.  Set aside some extra flour in a shallow dish.

6.  While the oil is heating, prepare the tortillas to your liking.  There are a few different ways you can do this.  When I am making tacos with soft corn tortillas, I heat a dry cast iron skillet over medium high heat.  I place a large sheet of aluminum foil near the pan.  I heat each tortilla in the skillet for about a minute or so on each side, or until it softens and begins to brown.


After each one is done, I place it on the foil and immediately start the next one.  I stack them on top of one another as I work.  When I'm done with the whole batch, I wrap them completely in the foil and place them in a 250 degree oven until I'm ready to assemble the tacos.  They always stay hot and soft!  If there are leftovers, I heat fresh tortillas for the next meal.  

6.  Fry the tofu:  Dredge several strips of tofu in the extra flour.  Dip them in the batter.  Allow the excess to drain off and then carefully drop in the hot oil.  Cook until golden brown, about 3 to 4 minutes.  Remove from the oil and transfer to a baking sheet lined with paper towels.  Sprinkle with salt to taste.  Do this in batches.  It took me about four batches to cook mine, but it went pretty quickly!


If you're not quite ready to eat, you can keep the tofu warm in the 250 degree oven with the tortillas.

7.  Assemble the tacos:  For each taco, place a tortilla on a plate.  If you have thin corn tortillas, as I did, use two for each taco.  Place a few strips of tofu down the center.  Top with some of the slaw.  Spoon on some of the aioli.  Garnish with a squeeze of lime and enjoy!


Well, I wasn't totally sure how these would go over, but we ended up really enjoying them!

My husband wasn't super excited when I said we were having tofu tacos, but he is always a good sport.  Also, he remembered my tofu "fish" tacos, so he knew there was a chance they could be great!  As it turns out, he is a fan of these Asian tofu tacos as well.  His complaint?  I used up the rest of our wasabi in the batter.  There was none to add as a garnish!  He wanted more wasabi, but I should probably disclose that the amount of wasabi he puts on sushi would blow your head off!  If you're like that, you may want some extra wasabi as well.  :)

What would I change?  Well . . . not much, honestly!  I suppose you could get the tofu to pop a little bit more with the right marinade, but it's a Thursday, not a Saturday!  I had to go back to school for an evening rehearsal.  There was no time for that kind of nonsense today!

I do think I would cut the tofu pieces slightly smaller next time.  There was a lot of flavor in the breading.  Making the tofu pieces smaller would make the breading more prominent and add more crunch!  Steve said the large pieces of tofu looked like big Hebrew National franks in some of the pictures.  Ha ha.  Ugh.  I didn't use those pictures!  (Don't get me wrong; Hebrew Nationals are good hot dogs, but in a taco with daikon radish slaw?  No.)

Well, I'm beat!  This is the first time I've started a taco post, gone to rehearsal, and then come home and finished it!  I'm calling it a day.  A busy day!

Feel free to comment on this recipe!  Did you try them?  What did you think?  Do you have any other great ideas for tofu tacos?

Thanks for reading!

Update:  These reheat really well.  Just place the tofu in a 375 degree oven (on a sheet of foil sprayed with cooking spray) and cook until hot and crisp.  Mine took about 8 minutes.  The breading will seem soggy when you start, but it comes back to life!  You may want to take the slaw and aioli out of the refrigerator a little while before you do the tofu so they are not ice-cold.  These tacos were just as good as leftovers!  :)

Monday, September 7, 2015

Mojitos!

Yum


Over the past few years, I have developed a real appreciation for Cuban food.  It's one of my favorites.  Cuban cuisine also features some pretty solid drinks.  One of my favorites, especially for summer, is the mojito.  I just served these with my latest taco recipe!

Mojitos are kind of like margaritas to me.  I can't order them out anywhere.  Ninety-five percent of the time, they are a sugary, hollow shell of the real thing.  If I'm in Key West . . . well . . . that's different.  They know how to make them!

I like my mojitos on the strong, limey, and minty side - a little bit sweet but not cloyingly so.  Here's my recipe.  Like any cocktail recipe, you have to adapt it to your preferences.  I love the little pieces of lime zest and muddled mint in the drink!

Mojitos

Serves 1 to ?

Ingredients:

Limes

Sugar

Fresh mint

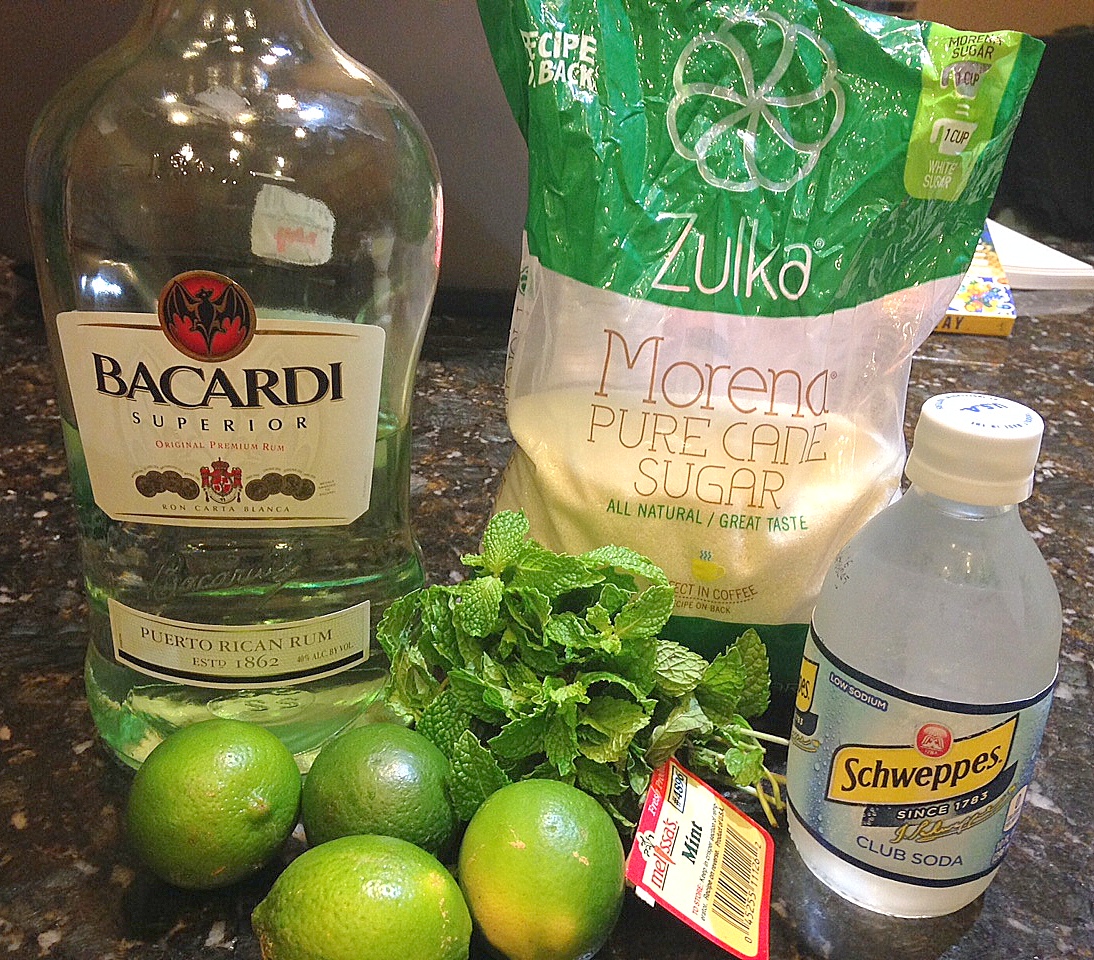
Light rum (I used Bacardi)

Ice cubes

Club soda


The proportions of all of these ingredients are up to your own personal taste.  I'll describe what I do; feel free to adjust as needed.

1.  For each serving, grate the zest of half a lime in a rocks glass.  (Ours hold about 12 oz.)  Squeeze in the juice of a whole lime.  (You will need more lime juice than zest.

2.  Add a scant tablespoon of sugar.    Adjust this amount to taste.


3.  Add a few sprigs of fresh mint.  At this point, ours looked like this:


Muddle the contents of the glass with the back of a spoon.  If you have fancy bar equipment, you can use that.  (We don't.)  Maybe some will show up for my birthday next month.  (Hint, hint.)  :)

4.  Add a healthy shot of rum.  The shot glass I use has a line just below the top that says 1.5 ounces.  I fill it all the way to the top!  If you let it overflow a little bit, I won't judge.  :)

5.  Fill the glass (more or less) with ice cubes.  Top off with club soda.  Stir and enjoy!


Do you have another method for making these?  Do you share my disdain for overly-sweetened drinks?  Please comment below!  Thanks for reading!

11. Rum-Marinated Shrimp Tacos with Mango-Black Bean Salsa and Crispy Plantain Strips

Yum

Now that I've passed the ten-recipe mark, I'm trying to get in all of the proteins (and other typical taco fillings) that I haven't used yet.  Obviously, with 100 recipes, I'm going to have to have some repeats.  Before I do another beef or tempeh taco, though, I want to make sure that I've featured all of the most obvious taco fillings.

Shrimp!  I haven't done shrimp yet.  That's just a shame . . .

This afternoon, I found these small(ish), peeled, and deveined shrimp at our local Fry's store.  Yes.  I'm OK with skipping a few steps for smaller shrimp!  They were wild-caught too, which was great.  I tend to avoid farmed shrimp.


I think I may have been having flashbacks to some wonderful shrimp tacos in Key West when I came up with this recipe.  Sigh.  I loved Key West.  We went in January 2013 and had so much fun!  We had the balcony of all balconies which was literally 90 miles from Cuba.


I just . . . can't even . . . 

Wow.

Anyway, I've had kind of a fantasy-based love affair with Cuba ever since I got to play Sarah in a 2010 production of the musical Guys and Dolls.  It was so much fun.  I was 35.  It was (seriously) my LAST chance to play Sarah.  Ha ha.  

If you don't know the story, Sarah takes a spur-of-the-moment flight to Havana with Sky Masterson and learns how to let her hair down.  The show was a ton of fun, and I invited a few of my closest show friends over for a Cuban-themed dinner party after the show wrapped.  I didn't know too much about Cuban cooking, but I'm a cookbook junkie, so I added a few to my collection to prepare for the dinner party.  The top book in the following photo has been a favorite ever since:


The other book is an actual souvenir that I got from that Key West trip a few years ago.  It's also pretty solid.  The only reason I haven't used it more is because the cookbook situation around here is completely out of control.

I didn't copy any recipes out of either of these books, but I definitely used them for inspiration.  The shrimp and mango salsa were loose adaptations of flavors that I discovered in my reading (and cooking).

The plantains were my interpretation of araƱitas, or plantain spiders.  I had made them before, and they were delicious, but I didn't think they would quite work in their original version.  They are little clumps of shredded, fried green plantains.  I wanted them to stay separate (kind of like shoestring potatoes,) so I changed the preparation method a bit.

It's Labor Day weekend.  I don't have to work tomorrow.  So . . . I also made mojitos.  I like them on the strong and not-so-sweet side.  I posted the recipe here.  If you're like me, check it out!

Here's the taco recipe!  :)

Shrimp Tacos with Mango-Black Bean Salsa and Crispy Plantain Strips

Serves 3-4 (about 12-16 small tacos), with extra salsa and plantain strips

Ingredients:

For the shrimp:

About 20 oz. medium shrimp, peeled, deveined (if desired) and tails removed
1/3 cup light rum
3 cloves garlic, finely chopped
2 tbsp. olive oil, divided
Juice of 1 lime
2 tsp. Pickapeppa sauce (or Worcestershire)
1/2 tsp. ground cumin
1/2 tsp. kosher salt
Freshly ground pepper to taste
1 tbsp. butter


For the mango-black bean salsa:


1 large ripe mango, peeled and diced
1 14.5 oz. can black beans, rinsed and drained
1/2 red bell pepper, finely chopped
1 small tomato, chopped
1/3 cup finely chopped red onion
1 serrano chile pepper, stemmed, seeded, and finely chopped
1/2 cup chopped cilantro
1 medium clove of garlic, finely chopped
1 tbsp. olive oil
1 tbsp. fresh lime juice
1/2 tsp. kosher salt
Freshly ground black pepper to taste


For the crispy plantain strips :

2 large green plantains
Canola (or other neutral-flavored) oil for frying
Kosher salt and freshly ground pepper to taste


12 to 16 small (street-taco size) corn tortillas


1.  Prepare the shrimp:  Whisk together rum, garlic, 1 tbsp. olive oil, lime juice, Pickapeppa sauce, cumin, and salt and pepper in a medium bowl.  Add the shrimp.  Cover and refrigerate, allowing to marinate for 60 to 90 minutes.


2.  Make the salsa:  Combine all of the salsa ingredients in a medium bowl.  Taste and adjust seasonings.  Cover and set aside.


3.  Prepare the plantain strips:  Peel the plantains by cutting off the ends and making lengthwise cuts along the peel.  You should then be able to pull the peel off with your fingers.  It's roughly the same as a banana, but a little more difficult to peel.  Coarsely grate the plantains.  I used a food processor.


Transfer to a bowl and season generously with salt and pepper.  Add canola oil to a medium skillet (about 10 inches) until a depth of about 1/2 to 3/4 of an inch is reached.  Heat the oil to about 360 to 375 degrees. 


4.  Fry the plantains in batches.  Sprinkle some plantains into the hot oil and stir with a slotted (heat-proof) spoon so they don't stick together too much.  When they are golden brown, transfer to a plate lined with paper towels.  Salt to taste.  Continue this process until all the plantains are cooked.  I did four batches, but they cooked so quickly that it wasn't a big deal at all.  Transfer all of the cooked plantains to a baking sheet lined with fresh paper towels.  (If you try to pull the golden-brown-stuck-to-the-spoon crispy plantain off the slotted spoon right after you're done cooking them, you'll burn your fingers.  Don't ask me how I know this.)  Keep the plantains warm in a 200 degree oven.  


5.  Prepare the tortillas:  Heat the tortillas in a dry skillet over medium-high heat, one by one, until browned but still soft, about 30 seconds to 1 minute on each side.  


As the tortillas are done, stack them on a sheet of foil.  When they are all finished, wrap them in the foil.  Since the oven is already on anyway, throw the whole packet in there along with the plantains!

6.  Cook the shrimp:  Pour the shrimp into a colander, allowing the liquid to drain out of it.  Heat the remaining 1 tbsp. olive oil and the butter in a large skillet over medium high heat.  Add the shrimp and stir, cooking until just done, about 3 to 4 minutes.  Remove from the heat.  Season with salt and pepper to taste.


7.  Assemble the tacos:  For each taco, place a tortilla on a plate.  Place several shrimp down the center of each tortilla.  Top with some of the salsa.  Finish with a sprinkle of the plantains.  Garnish with a squeeze of lime and enjoy!


We really enjoyed these, but I might try some modifications next time.

Honestly, I used the super-small street taco tortillas because I still had some leftover from my last taco recipe.  I think regular-sized corn tortillas would have been better.  The shrimp, even though they were medium-sized, were big for a taco filling.  The salsa was chunky, too.  It was easy for the pieces to fall out.  It wasn't a deal breaker, but I would have preferred a larger tortilla.

The serrano pepper that I put in the salsa was very mild.  I might try two of them next time . . . or a hotter pepper.

My husband thought the shrimp could have used more of a kick.  ???  I think he might have meant heat.  They had plenty of garlic.  I might bump up the Pickapeppa sauce to 1 tbsp. next time and add some cayenne.  They were still very flavorful, though.

There will be leftover salsa and plantains.  If the plantains are on the table, you might end up snacking on the rest of them until they are gone.  They are so good - I just thought I'd warn you!

We both agreed that, on a scale from 1-10, these tacos were a solid 8.5.  I would recommend making them.  We're just getting picky now, because the chicken tacos that I made on Friday were a 10!

It was a fun dinner.  I want to go back to Key West - and I want to visit Cuba.  As soon as it's legal.  :)

Feel free to comment on this recipe!  Did you try them?  What did you think?

Thanks for reading!

Friday, September 4, 2015

10. Fall-Spiced Chicken Tacos with Cilantro-Pumpkin Seed Slaw, Roasted Red Pepper Salsa, and Spanish Cheese

Yum

This taco recipe is a milestone.  Well . . . a small milestone.  I've finally reached recipe number ten!  If I continue at my current pace, I should be on track to post recipe number 100 on August 2, 2016!

I just recently realized that I haven't done a chicken taco yet.  I think it's about time!  Chicken is so versatile - my next dilemma was to settle on a flavor profile.  There are so many possibilities . . .

I remembered a tasty recipe for 16-Spice Chicken in one my favorite cookbooks:  Bobby Flay's Mesa Grill Cookbook.  I didn't copy the recipe, but I was inspired by the flavors presented in it.  The spices remind me of fall!  More importantly, this is probably the second or third day in a row that we've had a high temperature under 100 degrees.  I'm excited about that!  I figured I would run with it and go with a fall(ish) theme.  It can be a preview of fall, since it's still technically summer.

I decided to use the meat from a grocery store rotisserie chicken.  I buy one every now and then and I don't waste any of it.  I love to use the meat in recipes and I even save the bones and put them in a freezer bag that I reserve specifically for chicken stock ingredients.  I'm all about complicated recipes, but I have to admit that I love the convenience of a rotisserie chicken!

Before embarking on this recipe adventure, pull all of the meat off of your rotisserie chicken.  I've tried to use a fork before, but I've always found it easier to just use my fingers.  After you've finished, season with salt and pepper if needed (Mine was marked "naked" so it needed seasoning.)  Give it a toss so that the white and dark meat is evenly distributed.  Reserve three heaping cups of the meat and reserve the rest for another purpose.  It's great to freeze and add to soups, chili, pasta, etc.


I had to include pumpkin.  Of course.  :)  I decided to go with some pumpkin seeds in the slaw and a healthy dose of pumpkin ale in the chicken mixture.  I used Punk'n Ale from Uinta Brewing Company in Salt Lake City, Utah, but any seasonal pumpkin ale should work.


I felt like these tacos would need a healthy sprinkle of a very special cheese.  I settled on Manchego, the popular Spanish sheep's milk cheese.  I made a trip up to the Whole Foods in Chandler today, which is always a good time.  (The beer selection!  The bulk foods!)  I stopped by the cheese cooler to pick up some Manchego and I noticed that they had a bit of Cordobes cheese in the "Try A New Cheese!!!" basket.  Those are all very small pieces of cheese - just a couple of ounces or so.  I realized that would be the perfect amount, and I noticed that the Cordobes was also a Spanish sheep's milk cheese.  It was the same color and seemed to be the same consistency.  ???  I went for it.  You could definitely use Manchego, which would be much easier to find.  The Cordobes ended up being pretty close to Manchego, though it was just slightly softer and more buttery.  No complaints!

Anyway, enough small talk, right?  :)  Here's the recipe:

Fall-Spiced Chicken Tacos with Cilantro-Pumpkin Seed Slaw, Roasted Red Pepper Salsa and Spanish Cheese

Serves 3-4 (about 12-16 small tacos), with extra salsa

Ingredients:

For the red pepper salsa:


1 medium shallot
1 red bell pepper
2 medium tomatoes, about 8 to 10 oz., coarsely chopped
2 red Fresno chile peppers, stemmed, seeded, and coarsely chopped
1 medium clove of garlic
1 tbsp. olive oil
1 tbsp. red wine vinegar
1/2 tsp. kosher salt
Freshly ground black pepper to taste


For the cilantro-pumpkin seed slaw :

1 1/2 cups shredded green cabbage
1 1/2 cups thinly sliced/shredded spinach leaves
1 small to medium carrot, shredded
1/2 cup chopped cilantro
1 tbsp. olive oil
1 tbsp. red wine vinegar
1/2  tsp. kosher salt
Freshly ground pepper to taste
1/4 cup pumpkin seeds

For the spiced chicken mixture:

2 tbsp. olive oil
1 cup finely chopped onion
1 teaspoon brown sugar
2 cloves garlic, finely chopped
1/2 tsp. salt
1/2 tsp. ground cinnamon
1/2 tsp. ancho chile powder
1/2 tsp. New Mexico red chile powder
1/2 tsp. ground cumin
1/2 tsp. ground coriander
1/2 tsp. ground ginger
1/4 tsp. chipotle chile powder
A pinch each of ground cloves, ground allspice, ground nutmeg, and cayenne pepper
1/2 cup pumpkin ale (plus a few extra splashes if needed)
3 heaping cups shredded chicken, pulled from a grocery store rotisserie chicken (or leftover)

12 to 16 small (street-taco size) corn tortillas


A few ounces of Cordobes (or Manchego) cheese, finely grated

1.  Place the pumpkin seeds on a small baking sheet or sheet of foil.  Roast in a 325 degree oven until puffed and fragrant, about 5 to 6 minutes.  Set aside.  Turn the oven to broil.

2.  Peel and halve the shallot.  Place it and the red bell pepper on a baking sheet or sheet of foil.  Place under the broiler and roast both, turning the pepper as needed until the skin is blackened on all sides.  If the shallot begins to brown too much, you can remove it before the pepper is done.  The idea is just to brown the shallot and cook it a bit so that it's not completely raw.  This is how mine looked when I took it out:


When the pepper is roasted, allow it to cool and then peel, seed, and coarsely chop it.

3.  Finish making the salsa:  Place the cooled red pepper, shallot, and the remaining salsa ingredients in a blender or food processor and blend until smooth.  Adjust seasoning to taste, transfer to a small bowl,  and set aside.


4.  Make the slaw:  Place all of the slaw ingredients except for the pumpkin seeds in a medium bowl and toss.  Cover and set aside.

5.  Make the chicken mixture:  In a small bowl, combine the 1/2 tsp. salt, cinnamon, ancho chile powder, New Mexico chile powder, cumin, coriander, ginger, chipotle chile powder, cloves, allspice, nutmeg, and cayenne in a small bowl.  Set aside.


Heat 2 tbsp. olive oil in a large skillet over medium-low heat.  Add the onion and sugar and cook until the onion is soft and slightly caramelized, about 8 to 10 minutes.  Add the garlic and cook for another minute.  Add the spices.  Cook and stir for another minute.


Add the ale and stir to deglaze the pan.  Allow to simmer for a couple of minutes until most of the liquid has reduced.  Add the chicken.  Stir and cook for several minutes to allow the chicken to heat through.  Add another splash or two of the ale as needed so the mixture doesn't get too dry.  (A little for the pan, a little for the cook, etc.)  :)  Taste and adjust seasoning as needed.


6.  Prepare the tortillas:  While the chicken mixture is cooking, heat the tortillas in a dry skillet over medium-high heat, one by one, until browned but still soft, about 30 seconds to 1 minute on each side.  


As they are done, stack them on a sheet of foil.  When you have as many as you want, wrap in the foil and set aside.  You can keep them warm in a 200 degree oven if you wish.  

7.  Add the pumpkin seeds to the slaw and toss.


8.  Assemble the tacos:  For each taco, place a tortilla on a plate.  Place a small amount of the chicken mixture down the center of each tortilla.  Top with some of the slaw.  Spoon on some of the salsa.  Finish with a sprinkle of the cheese.  Enjoy!


OK.  The tacos are done and the kitchen is clean.  Now I need to tell you the truth . . .

These might be the best tacos I've made so far.  They were eclectic, but Southwest-y (or ish?) enough to fit in just perfectly on any hipster taco joint menu.

We had seconds!  We started with three and then had one more taco each.  The number of people that this recipe serves is completely dependent on your appetite and whether you include any sides.  I didn't make any sides, and four small tacos was perfect.  With a side dish, three tacos would have been fine.  I would say this recipe serves three - maybe four if you're not starving or if you serve something else with it.

The long list of spices makes this recipe sound more complicated than it is.  It really comes together pretty easily.

Just a quick note - these tacos are moderately spicy.  We loved them.  It was a really nice level of spice that stayed pleasant and didn't get more intense with time.  If spicy is not your thing, I would adjust the amount of Fresno pepper, cayenne, and/or chipotle chile powder.  Those would be the culprits!  They would still be great even if those elements were reduced a bit.

There is a good amount of salsa left.  At this point, I don't consider that a problem!  It was pretty tasty.

It's been a good Friday!  My taco-making pace is perfectly on target to reach my goal of 100 recipes in a year.  I'm going to post one more later this weekend.  It's a holiday weekend, so if I get really ambitious I might post two more.  We'll see . . .

Feel free to comment on this recipe!  Did you try them?  What did you think?  Is anyone else as ready for fall as I am?

Thanks for reading!

Update:  We ate the leftovers for breakfast.  We just couldn't wait!  :)

Thursday, September 3, 2015

Stitch Fix #10 Review - September 2015

Yum

Stitch Fix #10 Review September 2015 Collage

Stitch Fix Review - September 2015

Note:  This point contains affiliate links to support my blogging addiction!  :)

It's that time again . . . time for a Stitch Fix review!  I received my box yesterday.  It was a very busy day!  I came home from a full day at school and had about a one hour window to try on the items and take pictures before having a quick dinner and heading back for an evening rehearsal.  This is the first chance I've had to get this review finished!  I wanted to post it as soon as possible because I need help deciding what to keep.  Please help steer me in the right direction!  :)

If you're reading this, there's a good chance that you already know about Stitch Fix.  If you've never heard of it, there are many blogs, along with Stitch Fix's own website, that will give you all the details.  I won't write you a novel about it, but I'll tell you the basics:  As a member of Stitch Fix, you pay $20.00 to have your own personal stylist look at your style profile and preferences (which can include a Pinterest board).  They will choose five clothing and/or accessory items specifically for you.  They are shipped right to your doorstep!  You have three days to try the items with other things in your own wardrobe and decide if you want to keep them.  The $20.00 styling fee is credited toward any items that you decide to purchase, and you receive a prepaid shipping envelope to return anything that you don't want.  You can choose to receive fixes every month, every few weeks, or only once in a while.  I've had so much fun with Stitch Fix that I'm currently receiving boxes about every three weeks.

I signed up for Stitch Fix in January of 2015 and I've really been enjoying it!  I don't usually have much luck shopping for clothes in my local area.  The selection is pretty dismal.  I'm rarely in the mood for clothes shopping anyway, so Stitch Fix is a great option for me!

So . . . this is what my September fix brought:

1. Margaret M Emer Print Straight Leg Pant - Price - $78.00


Margaret M Emer Print Straight Leg Pant and Pixley Messi Lattice Neckline Knit Top

I was really excited to see these, because I have SO MANY pairs of plain black or grey slacks.  I have been wanting to try some pants with more color.  I love the print - it's cute!  Melanie, my stylist, suggested that I try them on with the Pixley Messi Lattice Neckline Knit Top from a previous fix (that I did not review) and some black flats, and I did!  It was a fun combination!

Margaret M Emer Print Straight Leg Pant and Pixley Messi Lattice Neckline Knit Top

When I took these pants out of the box, they looked too small, but then I realized that was because they are very stretchy.  There is no zipper - they are basically pull-on pants.  At first, I thought they would be too tight, but once I had them on, they were fine.  I'm not sure I'd wear them to work, though.  I think the size I received is appropriate for the style, but they are quite form-fitting.  At first, I almost felt like I was wearing yoga pants or leggings.

My husband and I did not quite agree on these - ha ha.  I was leaning toward yes, but he wasn't crazy about them.  He pointed out that they bunch up around my knees.  If you look at the picture, he's right.  They do - but I think it's just more noticeable because of the print.  After my hasty try-on session, I started paying attention to skinny pants/jeans that other ladies were wearing.  They all bunch up around the knees!

I don't know . . . what should I do?

Verdict:  UNDECIDED

2. Pixley Millie Textured Dress - Price - $68.00


Pixley Millie Textured Dress - Stitch Fix Review September 2015


Pixley Millie Textured Dress - Stitch Fix Review September 2015

I couldn't decide which picture of this dress to post.  I decided to go with both of my favorites.  I'm standing up straighter in the second one!  Ha ha.  I think that's the ticket with this dress.

I really thought this dress wasn't going to work.  I love the print and the overall style, but it just looked kind of small.  I could tell when I took it out of the box that it would be quite fitted.  I wasn't sure that it would zip in the back.  Surprisingly, it did, and it did so without creating any weird bulges.  That's always a plus!

I had fun trying on shoes with this dress.  I tried nude heels.  That worked.  I also tried some different red heels with more of a patent finish.  They were a little over the top.  Then I remembered these sling-back heels and matching clutch from Banana Republic.  I also included a cute red heart necklace.  Unfortunately, these shoes are one of the most uncomfortable pairs I own.  A few years ago, I wore them to a wedding and was unable to feel my toes for about a month afterward.  True story!  I love the combination, though.  Maybe I'll just wear this outfit when I know I won't have to walk/stand much . . .

Yes, it's a bit short.  Not a work dress.  That's OK - I usually don't wear dresses to work, anyway!

Verdict:  KEEP

3. Daniel Rainn Camulos Henley Tunic - Price - $68.00


and

4. Street Level Huron Reversible Magnetic Closure Tote - Price - $48.00


Daniel Rainn Camulos Henley Tunic and Street Level Huron Reversible Magnetic Closure Tote

Daniel Rainn Camulos Henley Tunic and Street Level Huron Reversible Magnetic Closure Tote

I'm kind of on the fence with this top.  I like it.  It's definitely my style, and I like a lot of the colors in it.  I have SO MANY boho/hippie tops, though!  It's also a little roomy.  I wish it had another button.  It's kind of on the borderline - do I wear a camisole with it because it's low-cut?  If the camisole shows, it will only show a bit, and it might not look like an intentional addition to my outfit.  It's also really HOT outside!  Still.  I can't picture myself wearing this for at least another month or so.

I do like it, though.  I'm just not sure if I love it.  My husband, on the other hand, likes it a lot.  Ha.  I like the pants; he likes this top.  Should I keep both?  Should I keep only one of the two?  Neither?  Help me!  What do you think?

Note:  I am wearing the Kut from the Kloth skinny jeans that I received in my first fix, and they also bunch up around the knees.  I think that's just what happens with this style of pant.  Right?

Verdict (top):  UNDECIDED

I'm going to pass on the bag.  I'm just not bonding with the wine color or the tote style.  I'm also not buying the whole "reversible" thing.  I tried that, and it seemed very . . . inside out.

I would actually like to DOWNSIZE my purse.  I have used the same Fossil purse for about 4 years now.  It's a lot smaller than this, and I still carry around a bunch of stuff that I don't use.  (Do I really need 10 lipsticks in my bag at all times? )  I'm embarrassed to say that I still have some souvenir (cardboard) coasters in there that I got from various bars/breweries on our last vacation, which was over a month ago!  What in the world are those still doing in there?  I need to get it together and start getting some cute bags that will not tempt me to stuff them with more stuff!

I might like to receive some smaller bags with a shoulder strap or maybe even some clutch bags.  Sigh.  I wish I was a bag person.  I would like to keep trying.  Maybe there's hope.  I just now started wearing cute hats every once in a while.  That took forever.  Ha ha.

As far as color goes, I am drawn more to bright primary colors or black.  I also like prints.  My Fossil elephant purse is multicolored.  It doesn't match with ANYTHING; therefore, it matches with EVERYTHING!  This wine-colored bag makes me feel like I need to match it with something.  That's probably just my hang-up.

Verdict (bag):  RETURN

5. Soko Bondo Curved Horn Necklace - Price - $48.00


Soko Bondo Curved Horn Necklace - Stitch Fix Review September 2015

This necklace.  Hmmm . . . I don't really know what to say about it.  It's just not my style at all.  I don't mind the length.  It's nice to have short necklaces to wear with certain tops.  I just find the pendant kind of big and clunky.  I don't think it's particularly interesting.  I'm in a silver rut with jewelry, and I'm trying to branch out.  I wouldn't mind some gold colored jewelry (or anything that's not silver), but this isn't it.  I don't think I'd ever wear it, and it's too expensive to take a chance.

Verdict:  RETURN

I had a great time trying these items and writing about them.  I feel that Melanie listened to my comments from last time and looked at my Pinterest board.  She sent exactly what I asked for - I got only one top and all the rest were other things!  It seems like I have kept mostly tops in the past and I really wanted to try some other items.  They didn't all work, but I would like to keep receiving interesting pieces that I wouldn't necessarily pick for myself.  I hope Melanie can style me again!  :)

OK - now I need some help!  What do you think?  Should I keep the pants?  Should I keep the top?   I have until Sunday to decide.  What do you think about the other items?  Please comment!  Thanks so much for reading!

Update:  My mom and my sister helped me out yesterday!  They came over for a birthday party and I showed them all the items.  They agreed with me on the bag and the necklace.  They also agreed that I have a bunch of tops like the one I received, so I decided I would feel OK about sending it back, even though it's cute.  The fact that it fit just slightly baggier than I prefer would always bug me.  There will be other boho tops in my future . . .

Also, I realized that if I kept the three most expensive items (as I almost did) it would cost nearly as much as keeping all five.  I didn't want to keep all five and clutter my closet with items I wasn't crazy about.  I decided I should probably just keep two.  The dress was already a given.  I went with the pants as my second keeper.   I always love my dear husband's input, but I'm the one that has to wear them, so I just decided to go with my gut and keep what I felt good about.  :)  I can't wait to see what I get next time!

If you're interested in giving Stitch Fix a try, please consider following my link to fill out your style profile and schedule your first fix!  (I just recently joined Stitch Fix's affiliate program, which means I get a small commission for anyone who signs up using my link.  However, my opinions are always my own and I pay for all of my own fixes!)

Please comment?  Did I make the right calls?  Have you received any of these items?  What did you think?  Thanks again for reading!

Second Update:  I got a SECOND box this September!  :)  Stitch Fix is just too much fun!  Check that review out here!

P.S.  If you like to cook, here's my latest eclectic taco recipe!  Check it out!