Sunday, September 13, 2015

13. Braised Pork Tacos in Green Chile-Tomatillo Sauce with Pepper Jack Cheese, Pickled Onions, and Cilantro

Yum

I've reached recipe number 13!  It is going to be a lucky number or an unlucky number???

I'm going to go with lucky!  I have a good feeling about it.  The main ingredient is in the oven right now, and it smells amazing!

What is the main ingredient, you ask?  (Actually, you're probably NOT asking this if you read the title and looked at the photo - ha ha.)  Well . . . I haven't done a pork taco yet.  I decided to remedy that on this lovely Sunday afternoon.

I picked up a pork tenderloin roast from our local grocery store today.  It was a little bigger than I wanted.  I was looking for around 2 pounds, and the one I bought was 4.25.  I cut it in half and put the rest in the freezer for another time.

Hmm . . . what to do with pork tenderloin?  I've had an impression of this cut of pork in my head for a while.  It's not a great impression.  I always think of it as rather dry.  I did a little bit of online reading about different options for pork tenderloin, and I found that you can actually braise it!  That's my favorite way to cook short ribs, lamb shanks, pork shoulder, etc.  I figured I would give it a try!

I decided to go with a green sauce - Hatch green chiles and tomatillos.  I used some beer because, well . . . beer tends to make things better.

Since this recipe requires a bit of advance preparation, I decided to keep everything else rather simple.  It was hard to do.  I wanted to add another sauce.  Another garnish.  Something?

No.  I told myself to let well enough alone.  For once!

Here's the recipe:

Braised Pork Tacos in Green Chile-Tomatillo Sauce with Pepper Jack Cheese, Pickled Onions and Cilantro

Serves . . . 6?? (It makes quite a bit!)

Ingredients:


For the pork:

One 2 lb. piece of boneless pork loin, seasoned generously with salt and pepper
2 tbsp. olive oil
3 cups chopped white onion, about 1 1/2 large
4 cloves garlic, minced
1 heaping cup coarsely chopped tomatillos, about 3 medium
2 tsp. ground cumin
2 tsp. dried Mexican oregano
2 or 3 dried bay leaves
1 lb. Hatch green chiles, roasted, peeled, seeded, and chopped
1 cup chicken stock
1 tsp. salt
1 bottle beer (not dark, I used a pilsner)


For the pickled onions:

1 small to medium red onion, thinly sliced
1 tbsp. cider vinegar
1 tbsp. olive oil
1/2 tsp. sugar
Kosher salt and freshly ground pepper to taste

12-24 corn tortillas, depending on their size and whether you plan to double them up (I would recommend doubling them up for this recipe.)


4 to 8 oz. grated pepper jack cheese, depending on how much cheese you like!

Cilantro leaves, for garnish

Instructions:

1.  Start the pork:  Preheat the oven to 290 degrees.  Heat 2 tbsp. of the olive oil over medium-high heat in a heavy, oven-safe pot, such as a Dutch oven.  Add the pork and brown on all sides. about 10 minutes total.


Remove the pork and set aside.  Add the onion to the pan, lower the heat to medium low, and cook the onion until it is soft and somewhat browned, about 8 to 10 minutes.  Add the garlic, tomatillos, cumin, oregano, and bay leaves and continue to cook until fragrant, about 3 minutes.  Add the chiles, chicken stock, beer, and salt and bring to a simmer.  Add the pork, cover, and place in the oven.


2.  Make the onions:  Toss all of the ingredients for the pickled onions together in a small bowl.  Cover and set aside.


3.  Keep an eye on the pork:  Turn it every 30 minutes or so and check on the tenderness.  The pork should cook for at least two hours, but you can let it go longer if desired.  Mine seemed tough after an hour, but was more tender around the two hour mark.  I think if I had let it go longer, it might have tenderized further.

4.  When the pork is done, remove the pan from the oven.  Place the pork on a plate, cover it, and let it rest for about 15 minutes or so. 

5.  Place the pan with the green chile sauce on a burner over medium heat and reduce while the pork rests.  If you wish, you can use a hand blender to blend the sauce a bit.

6.  While the sauce is reducing, prepare the tortillas to your liking.  There are a few different ways you can do this.  When I am making tacos with soft corn tortillas, I heat a dry cast iron skillet over medium high heat.  I place a large sheet of aluminum foil near the pan.  I heat each tortilla in the skillet for about a minute or so on each side, or until it softens and begins to brown.


After each one is done, I place it on the foil and immediately start the next one.  I stack them on top of one another as I work.  When I'm done with the whole batch, I wrap them completely in the foil and place them in a 250 degree oven until I'm ready to assemble the tacos.  They always stay hot and soft!  If there are leftovers, I heat fresh tortillas for the next meal.  

7.  Shred the pork:  Use two forks and pull the pork into small to medium pieces.  Mine looked like this:


Return to the pork to the pan with the sauce and allow to heat through.  Here's mine:


8.  Assemble the tacos:  For each taco, place a tortilla on a plate.  If you have thin corn tortillas, as I did, use two for each taco.  (As there in some sauce in the filling, I would definitely recommend two tortillas.)  Using a slotted spoon to avoid excess liquid, spoon some pork down the center of the tortillas.  Sprinkle with the cheese.  Add some of the onions.  Garnish with cilantro and enjoy!


I was really happy with these.  I wasn't so sure about using the pork tenderloin.  I would have preferred pork shoulder, but I didn't really want to drive up to Phoenix today.  I try to get humanely raised, vegetarian fed meat, and pork loin was the only choice (in that category for pork) at our local supermarket.  I decided to go with it!

One benefit to using pork tenderloin is that it didn't leave as much fat in the sauce.  I love lamb shanks and short ribs (and similar cuts), but when they are braised I always have to spend some time skimming the sauce.  It didn't seem necessary in this case.  I was afraid that the meat wouldn't be tender, but the low and slow cooking took care of that just fine!

One word of caution - this was SPICY!  The heat level of Hatch chiles seems to vary quite a bit.  If you don't love chile heat, this may not be the recipe for you.  In any case, I would taste the chiles to see how hot they are and make any adjustments that you feel are right for you.  You could use less chile and more tomatillo, or substitute a roasted bell pepper for some of the Hatch chiles, etc.  We love heat, and we were sweating a bit, so I just thought I would give you all a heads up!  We were all right with the spiciness, but we are definitely aware that not everyone is on the same page.  :)

There was a lot left.  We had two tacos each and were quite full.  I never make sides anymore.  We try to fill up on tacos.  Trust me, with this 100 taco thing going on, we don't NEED anymore leftover tacos in this house.!  I usually don't mind having them once more, but after that I'm done.  I don't like to waste food, though, so sometimes I try to reinvent the components as a pasta dish, or . . . something else.  I have to say, though - with these, I'm really looking forward to the leftovers!

Feel free to comment on this recipe!  Did you try them?  What did you think?  What should I make next?

Thanks for reading!


Saturday, September 12, 2015

Stitch Fix Keepers: February - July 2015

Yum
Stitch Fix Keepers: February - July 2015 Collage

Stitch Fix Keepers:  February - July 2015

Note:  This point contains affiliate links to support my blogging addiction!  :)

Since I just recently began writing reviews of my Stitch Fix boxes (September 2015 and August 2015), I've had some regrets!  I wish I had started sooner.  It's fun to share them with other people who also enjoy Stitch Fix!

I signed up with Stitch Fix in February of 2015.  Unfortunately, I didn't do a great job at documenting all of the things I received (at first).  As I perused my old photos, though, I did find several pictures of items that I kept and am still enjoying!  I thought I'd share them.  This collection is not all-inclusive.  I definitely kept more items than I've featured in this post.

I'll try to present the items in (roughly) the order I received them.

My first fix was great!  I kept all five of the items.  That's actually the only time I've kept everything.  My first fix included:

Skies Are Blue Nikkita Chevron Textured Blouse - Price - $28.00


and 

Kut From the Kloth Baxley Zipper Detail Skinny Jeans - Price - $88.00


and

Vanessa Mooney Callahan Fan Drop Earrings - Price $34.00


Skies Are Blue Nikkita Chevron Textured Blouse, Kut From the Kloth Baxley Zipper Detail Skinny Jeans and Vanessa Mooney Callahan Fan Drop Earrings

I know this photo isn't the best.  I was in a hotel room in Las Cruces, New Mexico.  My sister and I had driven there to go to a Janis Ian concert and I thought I'd take a quick selfie on our way out the door.  We had a great time at the concert.  Afterward, I stayed and waited for Janis to sign my program.  The first thing she said to me was, "I like your earrings."  Awesome!  I hadn't been too sure about the earrings, but now they are my favorite pair.  Ha ha!  Here's a close up:

Vanessa Mooney Callahan Fan Drop Earrings - Stitch Fix Keepers

I still wear all three of these items.  I love the sheer sleeves and the design on the blouse.  The price was also great!  I'm pretty happy with the jeans, too, though sometimes I wish they had a tighter feel.  They are so stretchy that they always feel like they are sagging.  They don't really look like they are sagging, but I'm not a fan of that much stretch.  It seems like a lot of skinny jeans are like that, though!

(Update:  Fortunately, I have recently found a solution.  I bought a flat belt to wear with skinny jeans.  It definitely helps!  I tried a couple of different brands, and the Beltaway brand was the one I liked the best.  It's not meant to be seen, so it only works if your top covers your belt loops, but it has definitely saved me from constantly pulling up my pants lately.  Here's a link if you want to give it a try!)


I'm glad I had an outfit that I felt so good about to wear to that concert - it definitely added to the fun of the evening!  :)

The next few photos are from a fix I got in May.  That one included:

Dear John Finnegan Roll Cuff Chino Short - Price - $48.00


Dear John Finnegan Roll Cuff Chino Short - Stitch Fix Keepers

I love these shorts!  I wasn't sure about the color at first.  It seemed like an odd color combination - kind of a gray-green background with dark navy-ish stripes.  They have turned out to be pretty versatile, though.  They almost seem like denim to me - they go with lots of things!  I wore them quite a bit throughout the summer.  I'm definitely glad I kept them.

In the same fix, I also received:

Just Black Adalyn Distressed Skinny Jean - Price - $78.00


Just Black Adalyn Distressed Skinny Jean - Stitch Fix Keepers

I know my face is totally shadowed in this picture - oh, well!  I was having some fun "modeling" for this one.  I'm not sure that I would actually wear these jeans out in public with a Guinness t-shirt and black heels.  Ha ha.  The hat, too . . . hmmm.  It looks like I'm taking myself way too seriously!

So . . . these jeans.  I have mixed feelings about them.  I'm not usually a fan of ankle-length pants, but I'm trying to branch out a bit.  I have come to appreciate the shorter length, but I wish they were less stretchy.  I actually wore them to a baseball game last night.  It was a hot evening.  I felt like they "grew" throughout the evening.  They were definitely loose around the waist by the time I got home.  My top covered that up, fortunately.  I find that I have to plan ahead for the inevitable stretching out that happens with these jeans.

(Update number two - I haven't gotten a chance to try the Beltaway with these jeans yet.  I'm sure it'll help!)

I also received a maxi dress in that fix:

Eight Sixty Coretta Maxi Dress - Price - $118


Eight Sixty Coretta Maxi Dress - Stitch Fix Keepers

This dress was right up my alley in a lot of ways.  The colors, the pattern . . . what's not to like?

Well, it was pricey.  It is also sheer, so I have to wear a slip underneath it.  Also, there is nowhere for bra straps to hide, so I either need to strategically wear a cute one or go with a strapless bra.  There were pros and cons, but I decided to keep it.  I really do like it, but I've only worn it once.  It's not appropriate for work, and we just don't go out much in the summer.  I'm really looking forward to wearing it again, but I've realized that I need to be selective with dresses.  I just don't have a lot of opportunities to wear them!

The next few items are from fixes that I received during June and/or July.  I believe this top was next:

Fun 2 Fun Clarise Mixed Print Top - Price - $38.00  


Fun 2 Fun Clarise Mixed Print Top - Stitch Fix Keepers

I love this top!  This ended up being one of my favorite summer tops.  I'm not a huge fan of pink, but the other colors seem to mellow the pink out a bit.  I love the combination of blue, aqua, and purple!  I've gotten quite a few compliments on it, so I think it was a good purchase.

You can also see the Kut From the Kloth shorts that I got in a my next fix.  The photo above was taken in Manitou Springs, Colorado.  I packed a handful of my favorite Stitch Fix keepers for that trip!

I got these next two items in the fix I received just before our trip (end of July):

Kut from the Kloth Knit Shorts - Price - ???


Kut From the Kloth Knit Shorts - Stitch Fix Keepers

I got these black shorts just before we went on our Colorado trip.  Notice how my little pug, Diego, photo-bombed me!  Unfortunately, I can't remember how much they were.  I searched for them on Pinterest, but I didn't find any other reviews that featured these shorts and also mentioned the price.  I think they were around $50?  I'm not sure.

Anyway, I wore them quite a bit over the summer.  Like some of my skinny jeans, they are also a bit stretchy.  For some reason, it doesn't bother me as much with these shorts.  I really like them and will continue to wear them.  I wasn't super excited about them at first because I had been asking for printed or colored shorts, but they really go with everything.  They're not the most exciting shorts ever, but I've gotten my money's worth!

In the same fix, I also got this top:

Collective Concepts Peasant Tribal Halter Top - Price - ???


Collective Concepts Peasant Tribal Halter Top - Stitch Fix Keepers

This top is something I never would have tried on in a store.  That's one thing I like about Stitch Fix!  If I'm shopping in a store, I don't generally look at stuff outside of my comfort zone.  However, if someone has taken the trouble to send it to me, I'll at least put it on.  I was surprised to find that I really liked it!  The halter look was a new thing for me . . . I actually went out and bought a strapless bra for this top!  I don't usually get hung up about a bra strap peeking out, but it really looked dumb with this top, so I bit the bullet.  :)  I'm also wearing the Dear John shorts I described earlier in my post.  I've gotten a few compliments on this top as well, so I'm glad I decided to try something different!

Unfortunately, I don't remember the price.  I remember it as being a bit pricey; I think it was about $60.

This photo was taken in the arcade area of Manitou Springs (the same Colorado trip).  I almost sat in this Big Bird airplane thing, but there was clearly a sign that said "No Adults", so I decided on this awkward pose instead!  Ha ha.

Well, I wish I had more photos of some of the things I've kept and enjoyed from Stitch Fix, but this is the best I could do.  Now, I'll just accept that the old Stitch Fix review ship has sailed and move on!  Ha ha.  I'll look forward to posting my future reviews.  It's a fun way to document everything I kept - it's also fun and interesting to have a record of the things I didn't keep.

By the way, If you're not familiar with of Stitch Fix, check out one of my previous reviews for a brief explanation of how it works.  If you're interested in checking it out, please consider following my link to schedule your first fix!  (I just recently joined Stitch Fix's affiliate program, which means I get a small commission for anyone who signs up using my link.  However, my opinions are always my own and I pay for all of my own fixes!)

Feel free to comment below!  Have you received any of these items?  Did you enjoy them?  Do you think I made the right call keeping these things?

Thanks so much for reading!

Thursday, September 10, 2015

12. Wasabi and Beer Battered Tofu Tacos with Cabbage-Daikon Radish Slaw and Lime-Avocado Aioli

Yum

As I said in my last taco recipe post, I'm trying to feature a few less-obvious taco fillings before I go back to beef, chicken, etc.  I've made some great progress, but I've got a long way to go before I reach  100 recipes, so I'm trying to rotate the main component of each recipe as much as I can!

I decided to go with tofu this time around.  I wouldn't say that tofu is my favorite food, but I definitely enjoy it.  It's pretty neutral in flavor, but it's not difficult to make it very tasty if you use a great marinade or sauce.

My recipe calls for pressed tofu.  If you've never done this before, it's easy.  Just place the block of tofu on a small plate.  Place another plate on top of it.  Set something slightly heavy (such as a bowl) on the top plate to press on the tofu.  It it's too heavy, you'll smash the tofu, so be careful.  Mine looked like this:


I put a small amount of water in the bowl pictured above to make it a bit heavier.  As the excess liquid is pressed from the tofu, pour it off of the bottom plate.  I usually press tofu for about 30 to 60 minutes.

For this taco, I was inspired by the times when I made a tofu version of fried fish tacos during my eight years as a vegetarian.  I definitely missed fish tacos when I was a vegetarian, but the tofu was pretty amazing!  I discovered that a fish taco is as much about the crunch of the breading, the tang of the lime, and and creaminess of the sauce as it is about the fish.

Are these THOSE tacos?  No.  Of course not.  That would be too easy.  If you've read any of my recipes at all, you know that I just can't leave well enough alone.

I decided to give them an Asian twist.  I don't know if they reminded me of fish tacos quite as much as my previous version, but they were delicious!  Here's the recipe!  :)

Wasabi and Beer Battered Tofu Tacos with Cabbage-Daikon Radish Slaw and Lime-Avocado Aioli

Serves 4 (about 8 to 10 generous tacos)

Ingredients:


For the lime-avocado aioli:

1/2 cup mayonnaise (use vegan if you wish)
1 ripe avocado
1 small clove garlic, chopped
Juice of one lime
1/4 tsp. salt


For the tofu:

1 14 oz. package firm or extra-firm tofu, drained and pressed
1 cup all-purpose flour (with extra for dredging)
About 10 oz. beer (not dark; I used a pilsner)
1 1/2 tbsp. tamari or soy sauce
1 tsp. garlic powder
1 tbsp. prepared wasabi (or more to taste)
1/2 tsp. freshly ground black pepper
Canola oil for frying


For the cabbage-daikon radish slaw:


2 cups shredded cabbage
1 cup peeled and shredded daikon radish
1 small carrot, peeled and grated
3 scallions, sliced
1/4 cup chopped cilantro
1 jalapeƱo, stemmed, seeded, and finely chopped
1 tbsp. canola oil
1 tbsp. rice vinegar
1/2 tsp. kosher salt


8-20 corn tortillas, depending on their size and whether you plan to double them up

Instructions:

1.  Make the aioli:  Place the aioli ingredients in a 2-cup glass liquid measuring cup.  Blend with a hand blender until smooth.  (You can do this in a regular blender or food processor if you wish.)  Taste and adjust seasonings.  Transfer to a small dish.  Cover and set aside.


2.  Prepare the batter for the tofu:  Whisk together flour, beer, tamari, garlic powder, wasabi, and pepper in a medium bowl.  Cover and set aside.


3.  Make the slaw:  Combine all of the slaw ingredients in a medium bowl.  Taste and adjust seasonings.  Set aside.


4.  Cut the tofu into large strips.  I cut mine into about 20 pieces, but if you like a lot of breading on your tofu, you could cut them smaller.  Mine looked like this:  (The plate is a salad plate.)


Pat any excess moisture dry with paper towels.  

5.  Add canola oil to a deep pot until a depth of about 2 inches is reached.  Heat the oil to about 360 degrees.  Set aside some extra flour in a shallow dish.

6.  While the oil is heating, prepare the tortillas to your liking.  There are a few different ways you can do this.  When I am making tacos with soft corn tortillas, I heat a dry cast iron skillet over medium high heat.  I place a large sheet of aluminum foil near the pan.  I heat each tortilla in the skillet for about a minute or so on each side, or until it softens and begins to brown.


After each one is done, I place it on the foil and immediately start the next one.  I stack them on top of one another as I work.  When I'm done with the whole batch, I wrap them completely in the foil and place them in a 250 degree oven until I'm ready to assemble the tacos.  They always stay hot and soft!  If there are leftovers, I heat fresh tortillas for the next meal.  

6.  Fry the tofu:  Dredge several strips of tofu in the extra flour.  Dip them in the batter.  Allow the excess to drain off and then carefully drop in the hot oil.  Cook until golden brown, about 3 to 4 minutes.  Remove from the oil and transfer to a baking sheet lined with paper towels.  Sprinkle with salt to taste.  Do this in batches.  It took me about four batches to cook mine, but it went pretty quickly!


If you're not quite ready to eat, you can keep the tofu warm in the 250 degree oven with the tortillas.

7.  Assemble the tacos:  For each taco, place a tortilla on a plate.  If you have thin corn tortillas, as I did, use two for each taco.  Place a few strips of tofu down the center.  Top with some of the slaw.  Spoon on some of the aioli.  Garnish with a squeeze of lime and enjoy!


Well, I wasn't totally sure how these would go over, but we ended up really enjoying them!

My husband wasn't super excited when I said we were having tofu tacos, but he is always a good sport.  Also, he remembered my tofu "fish" tacos, so he knew there was a chance they could be great!  As it turns out, he is a fan of these Asian tofu tacos as well.  His complaint?  I used up the rest of our wasabi in the batter.  There was none to add as a garnish!  He wanted more wasabi, but I should probably disclose that the amount of wasabi he puts on sushi would blow your head off!  If you're like that, you may want some extra wasabi as well.  :)

What would I change?  Well . . . not much, honestly!  I suppose you could get the tofu to pop a little bit more with the right marinade, but it's a Thursday, not a Saturday!  I had to go back to school for an evening rehearsal.  There was no time for that kind of nonsense today!

I do think I would cut the tofu pieces slightly smaller next time.  There was a lot of flavor in the breading.  Making the tofu pieces smaller would make the breading more prominent and add more crunch!  Steve said the large pieces of tofu looked like big Hebrew National franks in some of the pictures.  Ha ha.  Ugh.  I didn't use those pictures!  (Don't get me wrong; Hebrew Nationals are good hot dogs, but in a taco with daikon radish slaw?  No.)

Well, I'm beat!  This is the first time I've started a taco post, gone to rehearsal, and then come home and finished it!  I'm calling it a day.  A busy day!

Feel free to comment on this recipe!  Did you try them?  What did you think?  Do you have any other great ideas for tofu tacos?

Thanks for reading!

Update:  These reheat really well.  Just place the tofu in a 375 degree oven (on a sheet of foil sprayed with cooking spray) and cook until hot and crisp.  Mine took about 8 minutes.  The breading will seem soggy when you start, but it comes back to life!  You may want to take the slaw and aioli out of the refrigerator a little while before you do the tofu so they are not ice-cold.  These tacos were just as good as leftovers!  :)

Monday, September 7, 2015

Mojitos!

Yum


Over the past few years, I have developed a real appreciation for Cuban food.  It's one of my favorites.  Cuban cuisine also features some pretty solid drinks.  One of my favorites, especially for summer, is the mojito.  I just served these with my latest taco recipe!

Mojitos are kind of like margaritas to me.  I can't order them out anywhere.  Ninety-five percent of the time, they are a sugary, hollow shell of the real thing.  If I'm in Key West . . . well . . . that's different.  They know how to make them!

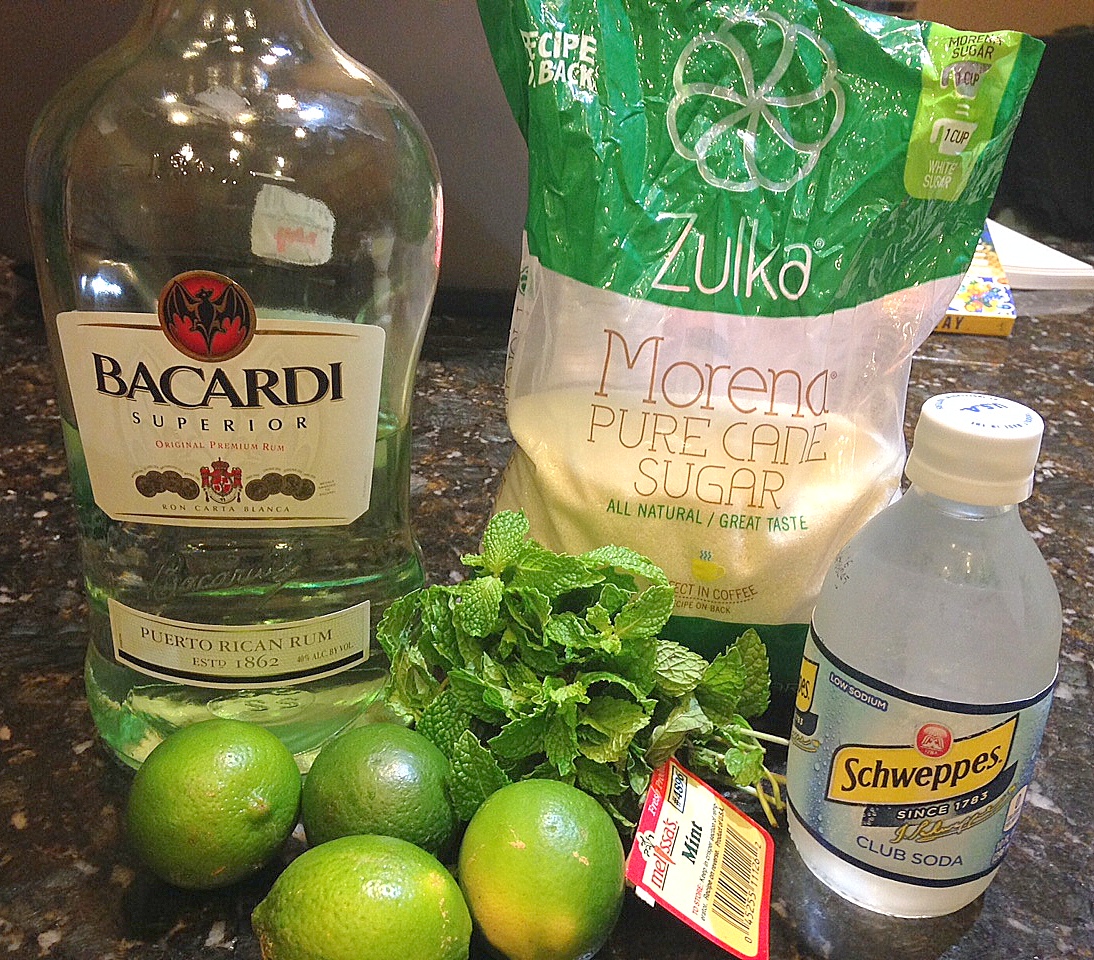
I like my mojitos on the strong, limey, and minty side - a little bit sweet but not cloyingly so.  Here's my recipe.  Like any cocktail recipe, you have to adapt it to your preferences.  I love the little pieces of lime zest and muddled mint in the drink!

Mojitos

Serves 1 to ?

Ingredients:

Limes

Sugar

Fresh mint

Light rum (I used Bacardi)

Ice cubes

Club soda


The proportions of all of these ingredients are up to your own personal taste.  I'll describe what I do; feel free to adjust as needed.

1.  For each serving, grate the zest of half a lime in a rocks glass.  (Ours hold about 12 oz.)  Squeeze in the juice of a whole lime.  (You will need more lime juice than zest.

2.  Add a scant tablespoon of sugar.    Adjust this amount to taste.


3.  Add a few sprigs of fresh mint.  At this point, ours looked like this:


Muddle the contents of the glass with the back of a spoon.  If you have fancy bar equipment, you can use that.  (We don't.)  Maybe some will show up for my birthday next month.  (Hint, hint.)  :)

4.  Add a healthy shot of rum.  The shot glass I use has a line just below the top that says 1.5 ounces.  I fill it all the way to the top!  If you let it overflow a little bit, I won't judge.  :)

5.  Fill the glass (more or less) with ice cubes.  Top off with club soda.  Stir and enjoy!


Do you have another method for making these?  Do you share my disdain for overly-sweetened drinks?  Please comment below!  Thanks for reading!

11. Rum-Marinated Shrimp Tacos with Mango-Black Bean Salsa and Crispy Plantain Strips

Yum

Now that I've passed the ten-recipe mark, I'm trying to get in all of the proteins (and other typical taco fillings) that I haven't used yet.  Obviously, with 100 recipes, I'm going to have to have some repeats.  Before I do another beef or tempeh taco, though, I want to make sure that I've featured all of the most obvious taco fillings.

Shrimp!  I haven't done shrimp yet.  That's just a shame . . .

This afternoon, I found these small(ish), peeled, and deveined shrimp at our local Fry's store.  Yes.  I'm OK with skipping a few steps for smaller shrimp!  They were wild-caught too, which was great.  I tend to avoid farmed shrimp.


I think I may have been having flashbacks to some wonderful shrimp tacos in Key West when I came up with this recipe.  Sigh.  I loved Key West.  We went in January 2013 and had so much fun!  We had the balcony of all balconies which was literally 90 miles from Cuba.


I just . . . can't even . . . 

Wow.

Anyway, I've had kind of a fantasy-based love affair with Cuba ever since I got to play Sarah in a 2010 production of the musical Guys and Dolls.  It was so much fun.  I was 35.  It was (seriously) my LAST chance to play Sarah.  Ha ha.  

If you don't know the story, Sarah takes a spur-of-the-moment flight to Havana with Sky Masterson and learns how to let her hair down.  The show was a ton of fun, and I invited a few of my closest show friends over for a Cuban-themed dinner party after the show wrapped.  I didn't know too much about Cuban cooking, but I'm a cookbook junkie, so I added a few to my collection to prepare for the dinner party.  The top book in the following photo has been a favorite ever since:


The other book is an actual souvenir that I got from that Key West trip a few years ago.  It's also pretty solid.  The only reason I haven't used it more is because the cookbook situation around here is completely out of control.

I didn't copy any recipes out of either of these books, but I definitely used them for inspiration.  The shrimp and mango salsa were loose adaptations of flavors that I discovered in my reading (and cooking).

The plantains were my interpretation of araƱitas, or plantain spiders.  I had made them before, and they were delicious, but I didn't think they would quite work in their original version.  They are little clumps of shredded, fried green plantains.  I wanted them to stay separate (kind of like shoestring potatoes,) so I changed the preparation method a bit.

It's Labor Day weekend.  I don't have to work tomorrow.  So . . . I also made mojitos.  I like them on the strong and not-so-sweet side.  I posted the recipe here.  If you're like me, check it out!

Here's the taco recipe!  :)

Shrimp Tacos with Mango-Black Bean Salsa and Crispy Plantain Strips

Serves 3-4 (about 12-16 small tacos), with extra salsa and plantain strips

Ingredients:

For the shrimp:

About 20 oz. medium shrimp, peeled, deveined (if desired) and tails removed
1/3 cup light rum
3 cloves garlic, finely chopped
2 tbsp. olive oil, divided
Juice of 1 lime
2 tsp. Pickapeppa sauce (or Worcestershire)
1/2 tsp. ground cumin
1/2 tsp. kosher salt
Freshly ground pepper to taste
1 tbsp. butter


For the mango-black bean salsa:


1 large ripe mango, peeled and diced
1 14.5 oz. can black beans, rinsed and drained
1/2 red bell pepper, finely chopped
1 small tomato, chopped
1/3 cup finely chopped red onion
1 serrano chile pepper, stemmed, seeded, and finely chopped
1/2 cup chopped cilantro
1 medium clove of garlic, finely chopped
1 tbsp. olive oil
1 tbsp. fresh lime juice
1/2 tsp. kosher salt
Freshly ground black pepper to taste


For the crispy plantain strips :

2 large green plantains
Canola (or other neutral-flavored) oil for frying
Kosher salt and freshly ground pepper to taste


12 to 16 small (street-taco size) corn tortillas


1.  Prepare the shrimp:  Whisk together rum, garlic, 1 tbsp. olive oil, lime juice, Pickapeppa sauce, cumin, and salt and pepper in a medium bowl.  Add the shrimp.  Cover and refrigerate, allowing to marinate for 60 to 90 minutes.


2.  Make the salsa:  Combine all of the salsa ingredients in a medium bowl.  Taste and adjust seasonings.  Cover and set aside.


3.  Prepare the plantain strips:  Peel the plantains by cutting off the ends and making lengthwise cuts along the peel.  You should then be able to pull the peel off with your fingers.  It's roughly the same as a banana, but a little more difficult to peel.  Coarsely grate the plantains.  I used a food processor.


Transfer to a bowl and season generously with salt and pepper.  Add canola oil to a medium skillet (about 10 inches) until a depth of about 1/2 to 3/4 of an inch is reached.  Heat the oil to about 360 to 375 degrees. 


4.  Fry the plantains in batches.  Sprinkle some plantains into the hot oil and stir with a slotted (heat-proof) spoon so they don't stick together too much.  When they are golden brown, transfer to a plate lined with paper towels.  Salt to taste.  Continue this process until all the plantains are cooked.  I did four batches, but they cooked so quickly that it wasn't a big deal at all.  Transfer all of the cooked plantains to a baking sheet lined with fresh paper towels.  (If you try to pull the golden-brown-stuck-to-the-spoon crispy plantain off the slotted spoon right after you're done cooking them, you'll burn your fingers.  Don't ask me how I know this.)  Keep the plantains warm in a 200 degree oven.  


5.  Prepare the tortillas:  Heat the tortillas in a dry skillet over medium-high heat, one by one, until browned but still soft, about 30 seconds to 1 minute on each side.  


As the tortillas are done, stack them on a sheet of foil.  When they are all finished, wrap them in the foil.  Since the oven is already on anyway, throw the whole packet in there along with the plantains!

6.  Cook the shrimp:  Pour the shrimp into a colander, allowing the liquid to drain out of it.  Heat the remaining 1 tbsp. olive oil and the butter in a large skillet over medium high heat.  Add the shrimp and stir, cooking until just done, about 3 to 4 minutes.  Remove from the heat.  Season with salt and pepper to taste.


7.  Assemble the tacos:  For each taco, place a tortilla on a plate.  Place several shrimp down the center of each tortilla.  Top with some of the salsa.  Finish with a sprinkle of the plantains.  Garnish with a squeeze of lime and enjoy!


We really enjoyed these, but I might try some modifications next time.

Honestly, I used the super-small street taco tortillas because I still had some leftover from my last taco recipe.  I think regular-sized corn tortillas would have been better.  The shrimp, even though they were medium-sized, were big for a taco filling.  The salsa was chunky, too.  It was easy for the pieces to fall out.  It wasn't a deal breaker, but I would have preferred a larger tortilla.

The serrano pepper that I put in the salsa was very mild.  I might try two of them next time . . . or a hotter pepper.

My husband thought the shrimp could have used more of a kick.  ???  I think he might have meant heat.  They had plenty of garlic.  I might bump up the Pickapeppa sauce to 1 tbsp. next time and add some cayenne.  They were still very flavorful, though.

There will be leftover salsa and plantains.  If the plantains are on the table, you might end up snacking on the rest of them until they are gone.  They are so good - I just thought I'd warn you!

We both agreed that, on a scale from 1-10, these tacos were a solid 8.5.  I would recommend making them.  We're just getting picky now, because the chicken tacos that I made on Friday were a 10!

It was a fun dinner.  I want to go back to Key West - and I want to visit Cuba.  As soon as it's legal.  :)

Feel free to comment on this recipe!  Did you try them?  What did you think?

Thanks for reading!