Saturday, August 15, 2015

5. Coffee-Rubbed Ribeye Tacos with Caramelized Onions, Creamy Horseradish-Gorgonzola Sauce, and Microgreens

Yum

When I started this project, I decided to present a variety of taco recipes.  Though I am not currently a vegetarian, I wanted to make sure to get past the ground meat, shredded cheese, and lettuce type of taco that I grew up with.  There's nothing wrong with those . . . but 100 recipes is a lot!

Since my last recipe was vegan, I decided to go to the opposite end of the spectrum and make some STEAK tacos!  Luckily, I had one big pasture-raised ribeye steak from Chiricahua Pasture Raised Meats in the freezer.  I also had some Gorgonzola cheese in the refrigerator that I bought for something else last week.  Also, I recently noticed that our Safeway has begun to carry a variety of delicious looking microgreens . . . and so, this recipe was born!

Disclaimer:  I usually cop out when it comes to cooking steak.  My husband is pretty picky about how his steaks are cooked.  I am, too, but I'm just a little less dramatic about it.  (For me, if it's cooked more than medium-rare, it's less than ideal.  According to him, if it's cooked more than medium-rare, it's basically ruined.)  Since I was a vegetarian for so long, I usually prepare everything else (the marinade, the rub, etc.) and then hand him the steaks, saying, "Here, cook these."  Then it's out of my hands.  See how that works?  If they are overcooked, it's not my fault - ha ha!

Well . . . I've decided I can't really do that anymore.  If I'm going to post a recipe for steak tacos, I have to cook the steak myself.  I turned to - who else?  Gordon Ramsay:  I watched this video a couple of times to get my confidence up!  Sure . . . I can do that! 


Anyway read on to find out all about these delicious steak tacos:

Coffee-Rubbed Ribeye Tacos with Caramelized Onions, Creamy Horseradish-Gorgonzola Sauce, and Microgreens

Serves 2-4 (4 to 8 tacos, depending on the size of your steak)

Ingredients:

For the caramelized onions:

2 large sweet onions, halved and thinly sliced
1 tbsp. butter
1 tbsp. olive oil
¼ tsp. salt
Freshly ground pepper to taste


For the creamy horseradish-Gorgonzola sauce

½ cup sour cream
¼ cup prepared horseradish
¼ cup Gorgonzola cheese
1 ½ tsp. cider vinegar
Pinch Piment d'Espelette or cayenne pepper
1 tbsp. minced chives
Kosher salt and freshly ground black pepper to taste


For the steak:

1 tsp. coffee beans
1 tsp. peppercorns
1 tsp. smoked paprika
¼ tsp. salt
One medium to large boneless ribeye steak (mine was about 12 oz.), at room temperature
Kosher salt and freshly ground pepper to taste
Olive oil
Canola oil for the pan
A few pats of butter


Microgreens of your choice


4-8 small flour tortillas (street-taco size)

1.  Make the caramelized onions:  Heat the oil and butter in a large skillet over medium heat.  Add the onions and cook for about 30 to 35 minutes, stirring occasionally, until the onions are soft and brown.  Be patient!  It seems like a lot of onions, but they will cook down significantly.  Once they are fully caramelized, season with the salt and pepper, set them aside, and keep them warm.


2.  While the onions are cooking, combine the sour cream, Gorgonzola cheese, horseradish, vinegar, and Piment d'Espelette in a small bowl.  Blend with a hand blender until fairly smooth.  Stir in the chives.  Taste and season to taste with salt and pepper.  Set aside.


3.  Grind the coffee beans and pepper corns in a spice/coffee grinder.  In a small bowl, combine with the smoked paprika and salt.  Season each side of steak with kosher salt, pepper, and a drizzle of olive oil.  Coat one side of the steak with the rub, pressing it into the steak so it will stick.


4.  Cook the steak:  Heat a pan over high heat.  When the pan is very hot, add a big drizzle of canola oil.  Add the steak, rub side down, and allow to cook for a couple of minutes.  Turn over, add some butter to the pan, and allow to cook until close to desired doneness (We like medium-rare.)  Using tongs, turn the steak on its side to allow some of the fat to render.  Move the steak to a plate and spoon some of the melted butter/rub mixture over the top.  Cover with foil and allow to rest.

5.  While the steak rests, heat the tortillas.  This is a quick step.  You could do this (gently) in a microwave, but I prefer to heat them one by one in a dry cast iron skillet over medium-high heat, about 30 seconds on each side.  Using this method, these heated much faster than my usual corn tortillas.  Stack them on a sheet of foil, and when all the tortillas are heated, wrap them up.

6.  Thinly slice the steak.

7.  Assemble the tacos:  For each taco, place a tortilla on a plate and spoon a small amount of caramelized onions down the center.  Top with a few slices of the steak, a sprinkle of microgreens, and a drizzle of the sauce.  If you like, you can garnish with a little bit of extra Gorgonzola cheese (me) or some extra horseradish (Steve).  Enjoy!


You can see from the pictures that we served corn on the cob with these.  Well . . . Steve is leaving for an art workshop tomorrow and we had a couple of ears in the refrigerator that needed to be eaten.  So, that's how that happened.  You can skip the corn or serve it with whatever else you like.  The corn was a pretty good match for this taco, though.  If you can find good corn, I would recommend it!

Overall, this recipe was a winner.  The caramelized onions were so good!  Steve compared them to a bass player - they don't necessarily jump out at you all the time, but you would miss them if they weren't there.  I think that's a good way to put it.

At first, Steve said the sauce "needed something".  He added some extra horseradish, and that seemed to do the trick.  As long as I have known him, no horseradish sauce has EVER been strong enough for him.  I think most people with normal taste buds will like the sauce the way it is - ha ha!

The microgreens didn't play a huge role in terms of flavor, but they looked so cool that I would definitely use them again.  I think they count as a token green vegetable, too.  Don't they?

If your steak is smallish, you will probably have some extra sauce and onions.  This is not necessarily a problem - I can think of a LOT of things I could put these on!  However, you could adjust the amounts of those things if you don't want leftovers.

OK.  I have to tell the truth.  The steak.  Sigh.  It turned out fine in the end, but I still need to practice my steak-cooking technique.  I got the pan REALLY hot, threw the steak in, and then panicked because I thought the rub was burning.  I think I turned it too soon, and I definitely took it out too soon.  It was extremely rare.  I'm not going to lie.  I had to wash the pan out, heat it back up, and throw the steak in for another round.  If Gordon was watching, I think there is a 99.2 percent chance that he would have been hurling expletives all over my kitchen.  That would have been kind of awesome, actually.  I would consider wrecking a steak on purpose just to have that happen.

Anyway . . . as you can see from the pictures, the steak was not overcooked.  It turned out just fine.  I need to practice with MORE steak tacos!

Well, I'm on my own for the next few days.  I'm going to take advantage of this time and cook all of the things that Steve doesn't really like.  Ha!  Next up:  butternut squash tacos.  My friend, Stacey, has graciously agreed to come over and help me test them.  :)

Thanks for reading!

Thursday, August 13, 2015

4. Ginger-Garlic Tempeh Tacos with Tomato and Red Pepper Pico de Gallo, Almond-Brazil Nut Cream, and Coconut

Yum

For my fourth taco recipe, I decided to get adventurous.  I chose tempeh as my protein.  If you've never had tempeh, it's a crumbly kind of patty made from fermented soybeans.  It probably doesn't sound that great, but it can be pretty tasty.  It has a neutral flavor, so you can do a lot with it.  I definitely developed an appreciation for it during my eight years as a vegetarian.  Yes.  I fell off the wagon.

The inspiration for the flavors in this recipe came from some of my favorite Thai recipes, but you'll notice that the herbs, spices, and other ingredients that I used appear in many types of food.  These tacos don't taste particularly "Thai".  They are kind of hard to pin down.  They're good, though!  So, here we go:

4. Ginger-Garlic Tempeh Tacos with Tomato and Red Pepper Pico de Gallo, Almond-Brazil Nut Cream, and Coconut

Makes about 10 tacos, serving 3 to 4, with leftover almond Brazil-nut Cream

Ingredients:

For the pico de gallo:

3 plum tomatoes, chopped
1 red pepper, roasted, peeled, seeded and chopped
¼ cup finely chopped red onion
¼ cup chopped cilantro
¼ cup chopped basil
2 Thai chiles, seeded and finely chopped
½ tsp. salt
Juice of ½ lime

For the almond-Brazil nut cream:

½ cup raw almonds, presoaked in water for a few hours and then drained 
½ cup raw Brazil nuts, presoaked in water for a few hours and then drained
¾ cup plus 2 tbsp. water
¼ tsp. salt


For the tempeh filling:

8 oz. tempeh
1 tbsp. peeled and finely chopped fresh ginger
3 cloves garlic, minced
¼ tsp. red pepper flakes
½ tsp. each cumin seeds and coriander seeds, ground in a spice grinder
1 tbsp. tamari or soy sauce
2 tbsp. coconut oil


Small flour tortillas (street-taco size)
½ cup toasted unsweetened coconut
toasted sesame seeds (optional) and lime slices, for garnish

1.  Combine the pico de gallo ingredients in a small bowl.  Taste, adjust seasonings, and set aside.

2.  In a heavy duty, high-speed blender (I used a Vita-Mix), blend the almond Brazil-nut cream ingredients until fluffy and smooth.  This could take several minutes.  Be ready to scrape down the inside of the blender as needed.  Adjust the amount of water to your liking.  I started with ½ cup and continued to add water until I was able to make the mixture smooth.  The texture of mine was somewhere between sour cream and finely-textured ricotta cheese.  Transfer to a small bowl and set aside.


3.  Shred the tempeh with a box grater.  It will sort of half shred and half crumble, but that's OK.  This is how mine looked:


Yes, that's a Sierra Nevada Hop Hunter IPA in the background.  Don't put that in the tacos.  Ha ha.  Heat the coconut oil in a large skillet over medium heat.  Add the garlic and ginger, and cook for 2-3 minutes until fragrant.  Watch it carefully so the garlic doesn't burn.  Add the cumin, coriander, and crushed red pepper, and cook and stir for another minute.  Add the tempeh and cook, stirring occasionally, for another 5-6 minutes.  It will get a bit dry during this time, but the coconut oil should ensure that it doesn't stick too much.  Let it cook and heat through, and even brown a bit, but don't let it burn or start to stick excessively.  Add the tamari and stir.  Cook and stir for another minute or two.  Set aside and keep warm.

4.  Heat the tortillas.  This is a quick step.  You could do this (gently) in a microwave, but I prefer to heat them one by one in a dry cast iron skillet over medium-high heat.  Using this method, these heated much faster than my usual corn tortillas.  I stacked them up on a sheet of foil and had them done in no time.  Since this was my last step, I didn't need to keep them warm in the oven.

5.  Assemble the tacos:  For each taco, place a tortilla on a plate and spoon a small amount of the almond-Brazil nut cream down the center.  Top with a small amount of the tempeh mixture, some pico de gallo (using a slotted spoon to avoid excess liquid), and a little more of the cream.  Garnish with toasted coconut, sesame seeds if you have them, and a squeeze of lime.  Enjoy!


OK - now it's time for the verdict.  These were very different!  We both liked them and ate three of them each (as pictured above).  It's funny - I mentioned to my husband that they were vegan, and he said "How can they be vegan with this cheese?"  I told him the cream was actually made of nuts and he was surprised.  He said they were delicious, especially since they were vegetarian, but he admitted that he might have preferred the same recipe with shredded chicken substituted for the tempeh.  I agreed with him that that would have been great, but these were also pretty solid tacos.  We both liked the fact that they were satisfying, but still rather light.  Neither of us felt overly stuffed after eating them.  That's always a plus!

The tempeh filling was a bit on the dry side by itself (it had kind of a fried rice-like texture), but it was perfect with the pico de gallo on top.  The pico de gallo was outstanding just by itself.  I would make it again to put on . . . whatever.  Pancakes.  Nachos.  ALL THE THINGS.  That was probably my favorite part of this recipe.

The almond-Brazil nut cream was an improvisation.  I was going to make a cashew cream, which I have never made before, but our local grocery stores are not particularly vegan-friendly.  I couldn't find any raw cashews.  We recently ran out of them at home, but we DID have raw almonds and Brazil nuts.  I have a feeling that my version was not quite as smooth as what you might get with cashews, but it was pretty tasty.  The recipe made a lot, though, so you might want to consider halving it if you have a smaller blender that is up for the job.  On that note - this would be tough without a heavy-duty blender.  If you want to try it with a food processor, just be aware that it will have a slightly different texture.

Overall, I was pretty happy with the flavor combination.  It was fun to take the "What is a taco?" question even a bit further.  I love using flavors that are kind of ambiguous.  You can find cumin, coriander, basil, cilantro, coconut, and ginger in so many cuisines.  These tacos had kind of a hybrid vibe.  I dug it.  Those salmon brunch tacos from Sunday, though . . . MAN.  Those are tough to follow!

Until next time!  Thanks for reading!  :)

Wednesday, August 12, 2015

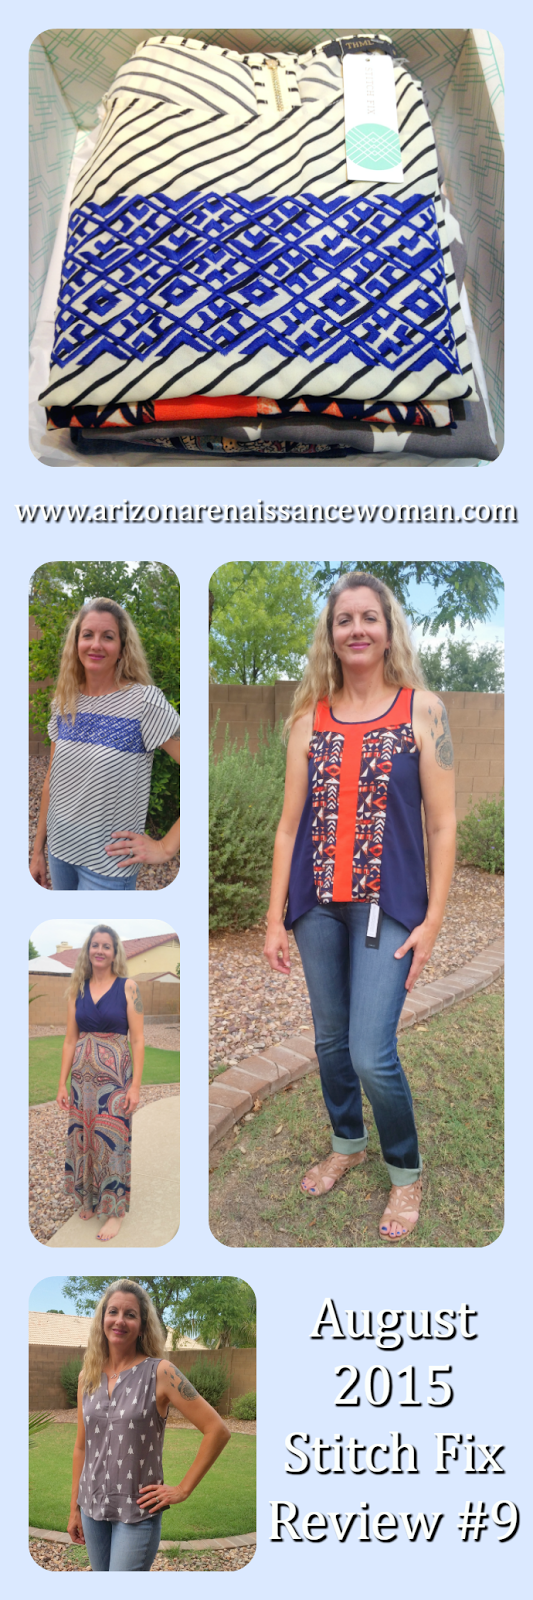
Stitch Fix #9 Review - August 2015

Yum
August 2015 Stitch Fix Review Collage

Stitch Fix Review - August 2015

Note:  This point contains affiliate links to support my blogging addiction!  :)

Well, I'm going to try a new kind of post this time.  That's right - a Stitch Fix review.  As you can tell from my first photo, this is my ninth fix.  I'm a little late to the party.  That happens a lot.  I enjoy reading reviews from other women that enjoy this service, so I thought, "I have a blog.  Why not?"

If you've never heard of it, there are many blogs, along with Stitch Fix's own website, that will give you all the details about the cool phenomenon that is Stitch Fix.  I won't go too crazy, but I'll tell you the basics:  Basically, as a member of Stitch Fix, you pay $20.00 to have a stylist look at your personal style preferences (which can include a Pinterest board) and choose five clothing and/or accessory items specifically for you.  They are shipped to your doorstep in a box, like the one pictured above.  You have three days to try the items with other things in your own wardrobe and decide if you want to keep them.  The $20.00 styling fee is credited toward any items that you decide to purchase, and you receive a prepaid shipping envelope to return anything that you don't want.  You can choose to receive fixes every month, every few weeks, or only once in a while.

If you're interested in checking it out, please consider following my link to fill out your style profile and schedule your first fix!  (I just recently joined Stitch Fix's affiliate program, which means I get a small commission for anyone who signs up using my link.  However, my opinions are always my own and I pay for all of my own fixes!)

August 2015 Stitch Fix Review - In Box

So . . . here's what I got:

1. THML - Samford Petal Sleeve Top - Price - $48.00


THML Samford Petal Sleeve Top - August 2015 Stitch Fix Review

I liked this top right away.  The embroidery across the front (and back) is blue - my favorite color.  I loved the diagonal black stripes as well.  It fit perfectly!  It's all polyester, so on this post-monsoon-storm afternoon, it was not a fun top to wear outside in the sun.  Under normal circumstances, though, it should work pretty well.  This is definitely a great work shirt.  It's a little sheer, so I will probably wear a camisole underneath.  I don't love doing that, but - oh, well.  It's cute.  :)

Verdict:  KEEP

2. THML Gloria Hi-Lo Blouse - Price - $48.00


and 

3. DL1961 Ember Straight Leg Jean - Price - $98.00


THML Gloria Hi-Lo Blouse and DL1961 Ember Straight Leg Jean

I decided to try these two items on together!  First:  the top!  I like the fit, the colors, and the print.  Orange is not usually my favorite, but the blue seems to mellow it out a bit.  It's another polyester shirt, so I was dying out there, but I had to get my pictures!  I could definitely see myself wearing this, and my husband also gave it a thumbs up.

Verdict (top):  KEEP

Honestly, I was not too excited to see basic jeans in this fix.  I would love to try colored or printed denim, but I have plenty of blue jeans that fit pretty well, and I knew the only way I would keep these is if I was in love with them.  They were VERY long!  I'm pretty tall (5'9"), and the only way these would work is if I rolled them up.  They were also a straight leg cut, so the cuffs were kind of baggy.  They were extremely stretchy.  I had the feeling they would have been sagging in an hour or two.  The rise was also a little higher than I prefer.  They were kind of a cross between skinny jeans and "mom jeans".  I didn't think they were particularly flattering.  They are expensive too.  They weren't terrible, but I wasn't a huge fan.

Verdict (jeans):  RETURN

4. Pixley Meryl Tulip Print Sleeveless Blouse - Price - $54.00


Pixley Meryl Tulip Print Sleeveless Blouse - August 2015 Stitch Fix Review

This was a surprise.  I loved the print, but when I put it on, I immediately thought, "No.  It's too baggy.  The arm holes are too big."  I had my husband take a quick picture so I could have it for the review, but said I wasn't keeping it.  Since this is my first Stitch Fix review, he didn't realize that I wanted to keep the picture for my blog, so he deleted it!  A little while later, I had to put it back on to take another picture and then had some second thoughts.  It is a little less fitted than the other tops, but I think the cut is part of it.  There are pleats in the shoulders that make it a little looser than a top without those pleats would be.  I turned around and looked in the mirror, and I saw that I was perfectly covered up.  Nothing really showed through the arm holes.  My husband basically told me, "You're crazy.  It looks great.  Keep it."  :)

Verdict:  KEEP

5. Gilli Liana Maxi Dress - Price - $68.00


Gilli Liana Maxi Dress - August 2015 Stitch Fix Review

Last, but not least, I got a maxi dress.  I loved the colors.  I'm not usually crazy about paisley, but I liked this print.  My husband thought it was pretty, too.  Sigh.  It didn't really work.  The fabric was extremely clingy.  I felt like it hugged every bulge on my body, and not in a good way.  I refuse to wear shapewear, so if something makes me feel self-consciously pudgy, it's not going to work.  It is what it is - ha ha!  Also, the pattern was crooked.  You can kind of see it in the picture.  The pattern looks like it has a "middle", but it didn't really line up with my middle.  Weird.

Verdict:  RETURN

In general, I think this was a great fix.  I got three tops that I really like.  Melanie, my stylist (a new one this time) did a great job at picking items similar to things I had pinned on my Stitch Fix Pinterest board.  Here's my style card and her note to me:

August 2015 Stitch Fix Review - Style Card

Melanie, PLEASE style me again!  :)

I really wish I could have more luck with items that are not tops.  As in some of my previous fixes, I kept the tops and sent the other things back.  I will make a note next time that I'd like to receive fewer tops and more shorts, pants, skirts, and accessories.  I can't complain, though.  I had a fun time modeling for these pictures in our hot and humid backyard at 4 in the afternoon - and there were some winners!

Thanks for reading!  Let me know what you think about my choices!  Did I made the right calls?  Feel free to comment!

And if you like tacos . . . check out The Taco Project.  Elsewhere on my blog.  :)

Sunday, August 9, 2015

3. Champagne-Poached Salmon Tacos with Baby Arugula and Dill Hollandaise

Yum


For this latest adventure, I decided to try a brunch taco.  I was thinking about seafood Benedicts, for some reason, so I came up with the idea of using salmon and Hollandaise.  Since my last two recipes have used corn tortillas as a shell, I wanted to try something different for this one.  It is a weekend, after all, so I figured I had time to experiment!  I decided on a mashed potato pancake.  I also wanted a fresh element to contrast the richness of the Hollandaise, so I added some lightly dressed baby arugula leaves.  I ran into a few hiccups along the way, but the results were outstanding!  Here's the recipe:

Champagne-Poached Salmon Tacos with Baby Arugula and Dill Hollandaise


Makes about 12 small tacos, or 4 servings

Ingredients:

For the potato-chive pancakes:

½ cup plus 2 tbsp. all-purpose flour
2 small Yukon gold potatoes, about 8 oz., peeled and quartered
1 tsp. baking powder
½ tsp. baking soda
½ tsp. kosher salt
1 ¼ cups whole milk
I egg
1 tbsp. olive oil
1 tbsp. minced chives

For the poached salmon:

2 medium wild salmon fillets, about ¾ to 1 lb.
½ cup dry champagne (or sparkling wine, prosecco, cava, etc.)
½ cup bottled clam juice (or fish stock, if you’re lucky enough to have it)
¼ tsp. kosher salt
¼ tsp. freshly ground pepper
2 small to medium shallots, coarsely chopped
1 stalk celery, coarsely chopped
A couple of large fresh Italian parsley sprigs


For the dressed arugula:

2 cups baby arugula leaves
1 tbsp. olive oil
1 tsp. sherry vinegar
Kosher salt and freshly ground pepper to taste

For the dill Hollandaise:

3 egg yolks, at room temperature
½ tsp. kosher salt
Dash cayenne pepper
1 tbsp. heavy cream
1 tbsp. lemon juice
2 sticks (1 cup) unsalted butter
1 tbsp. chopped fresh dill

1.  Place the potatoes in a small pot and cover with water.  Add a couple of pinches of kosher salt.  Bring to a boil over medium heat.  Lower the heat and simmer until tender, about 12 to 15 minutes.  Drain and coarsely mash; set aside to cool.

2.  In a small skillet, combine the champagne, clam juice, 1/4 tsp. salt, 1/4 tsp. pepper, shallots, celery, and parsley.  Bring to a low boil and add the salmon fillets, skin side down.  Season the top of the fillets with salt and pepper.


Cover and simmer gently until the salmon is barely done, about 7 to 8 minutes.  Watch it closely; when it just begins to flake, it is done.  Remove from the heat and set aside (Leave the pan uncovered or partially covered so the salmon does not continue to cook.)

3.  Combine the potatoes and all pancake ingredients except the chives in a blender.  Blend on medium speed until fairly smooth.  Transfer to a medium bowl and stir in the chives.  Spray a large skillet with non-stick cooking spray and heat over medium-low heat.  Cook the pancakes, 3 at a time, using about 3 tablespoons of the batter for each one.  They should spread out to about the size of a street-taco tortilla.


When the top is mostly set and the bottom is lightly golden, flip and cook the other side.  Do not attempt to flip until the top is set!  They have a tendency to stick at first, so be patient!  I had to throw my first batch away because I flipped them too soon and they fell apart.  As the pancakes are finished, stack them on a sheet of foil.  When they are all done, carefully wrap them up and keep warm in a 250 degree oven.

4.  Take the salmon out of the poaching liquid.  Remove the skin and break the fillets into large flakes.  Taste for seasoning and add salt and pepper to taste if desired.  Set aside in a small bowl and spoon a small amount of the poaching liquid over the salmon to keep it moist.

5.  Place the arugula in a small bowl.  Drizzle with the olive oil and sherry vinegar and toss.  Add salt and pepper to taste and toss again.

6.  Make the Hollandaise:  Heat the butter in a small saucepan until bubbling.  Place the egg yolks, salt, cayenne, and cream in a 2-cup glass liquid measuring cup.  Blend with a hand blender until well blended and foamy.  I was not able to get the bottom of my hand blender completely submerged at this point, but the end result turned out fine!  Slowly add half of the butter while blending with the hand blender.  Add the lemon juice, then continue to blend and slowly add the rest of the butter.  Stir in the dill.  By the way, if you don't have a hand blender, you could just make the Hollandaise in a regular blender.

7.  Assemble the tacos:  For each taco, place a potato pancake on a plate and top it with a small amount of the salmon.  Top with the arugula and spoon some Hollandaise over all.  Add a squeeze of lemon juice if desired.  And a big pile of bacon.  It is brunch, after all.  :)


So, that's that.  The verdict?  Wow.  Really.  In the end, everything came together just as I had hoped.  The salmon had a nice flavor from the poaching liquid.  The bitterness of the arugula (and the tangy sherry vinegar) mellowed the decadence of the Hollandaise.  The potato pancakes proved to be a great "taco shell".  I was able to stack them up without them sticking together and they were sturdy enough to hold the filling so we could pick up the tacos without them falling apart.  I will definitely be using this pancake recipe as a base for other "shell" concoctions.

This is my favorite recipe so far.  My husband said it was one of the best things I have ever made.  Trust me, he would tell me if they were awful.  Ha ha.

AND . . . Did anyone notice that, with this recipe, there is most of a bottle of champagne left over?  Mimosas!!!  Doesn't that work out just perfectly?  :)


Now, I need to disclose a few things about this recipe.  I'm not going to lie.  It was a lot of work!  There are a lot of steps, and a lot of things that need to be done simultaneously, especially at the end.  If you were thinking this might be a great recipe to triple so you can invite 11 of your friends over . . . ummm . . . no.  Don't do it.  If you want to seriously impress one to three other people that just want to chill and drink mimosas while you make a pretty big mess in the kitchen, then yes.  Make it.  You won't be sorry!

The most difficult part was dealing with the pancakes, because they did not behave like regular breakfast pancakes.  I made the mistake of starting with olive oil in the pan instead of cooking spray.  I would not recommend that.  They stuck terribly, and I had to scrape them out, wash the pan, and try again.  Here's a picture of that mess.


Here's a picture of Frida and Diego, who thought the mess was delicious.  (I gave them a little bite.)


Frida is so excited about getting to try it that her whole body is vibrating.  I could not get a good picture.  I tried several times and this is the best one.  So the first batch wasn't a total loss!

Once I figured out that I needed cooking spray and that the batter really needed to set before I even thought about flipping it, the rest of the pancake-making was fairly smooth sailing.

The other challenge to this recipe was plating the dish.  The hand blender Hollandaise, which I adapted from an epicurious.com recipe, does not stay very warm.  The salmon will probably get cool as well while you flake it.  If you're not picky about food temperature, it might not be a big deal.  We're kind of weird about that, so I gently heated both the salmon and the Hollandaise in the microwave before I plated the tacos.

Once we sat down and tasted the tacos, it was all worth it.  We had a great brunch and I was smiling for the next hour as I cleaned up my messy kitchen!

Next time?  I'm not sure yet.  Something with vegetables, maybe . . . Thanks for reading!  :)


Saturday, August 8, 2015

Slow-Braised Pork with Black Grapes and Balsamic AND Salad with Apples, Shaved Asparagus, Gorgonzola, and Pecans

Yum

Slow Braised Pork with Black Grapes and Balsamic and Apple Salad with Shaved Asparagus, Gorgonzola, and Pecans Collage

Slow Braised Pork with Black Grapes and Balsamic


and

Salad with Apples, Shaved Asparagus, Gorgonzola, and Pecans


Note:  This point contains affiliate links to support my blogging addiction!  :)

So, this might be shocking, but tonight I made something that is NOT tacos.  I had (and still have) a few different types of local, pastured meat in the freezer that I wanted to save for something special.  Every now and then, I stock up with an order from Chiricahua Pasture Raised Meats.  They are located south of Tucson.  It's worth it to me to drive down to Tucson every couple of months and pick up an order.  If you're in Arizona, check them out.  This evening, my husband told me it's the best pork he's ever had.  :)

Anyway, I did NOT make up this recipe.  I found it on epicurious.com.  Here's the link!

It was awesome - I would definitely recommend it.  Here's a picture of the black grapes and shallots as they brown:

Black Grapes and Shallots for Slow Braised Pork

And here's a picture after I added the browned pork later on:

Browned Pork for Slow Braised Pork with Black Grapes and Balsamic

For an appetizer, I served a salad from a new cookbook that I bought about a week and a half ago.  I recently bought a spiralizer.  I thought it would be a fun to present fruits and vegetables in some unexpected shapes, and possibly come up with some ways to use less pasta and rice!  This is the spiralizer that I bought:


Don't get me wrong, I love pasta and rice.  It can get a little out of hand sometimes, though.  :)  Anyway, I ordered this cookbook to get some ideas for my new kitchen toy:


The salad was an apple, shaved asparagus, and watercress salad with pecans and gorgonzola.

My husband said it looked pretty scary, but he (literally) ate his words when he tasted the salad.  It was great.  I had no idea you could shave raw asparagus like that and serve it in a salad.  So far, I highly recommend the cookbook (and the spiralizer.)

Apples with Shaved Asparagus, Gorgonzola, and Pecans from Inspiralized

OK, back to the pork.  After we had the salad as an appetizer, I plated the pork with mashed potatoes.  I let Steve (my husband) make the mashed potatoes, because his are always amazing.  We served it with a Petite Verdot from Page Springs Cellars in Cornville, Arizona.  We just became members of their wine club last winter, and we are definitely enjoying the shipments.  The wine was a perfect match!

Slow Braised Pork with Black Grapes and Balsamic

Well, this evening didn't feature any of my own recipes, but it was outrageously delicious, so I wanted to share the recipes and sources.  Tomorrow (morning):  taco recipe number 3!!!

Feel free to comment!  Do you have a spiralizer?  If so, what are your favorite ways to use it?

Thanks for reading!  :)

The Taco Project

Yum
By now, those of you that have been checking out my blog posts might find yourself wondering . . . "What's up with the tacos?"  Yeah.  I know.  I feel the same way, but at this point, I feel that I'm kind of powerless to stop it.  I think it's my destiny.  O.o

So, how did this start?  Well, it started with a taco cookbook that I have never even seen.  I don't know who wrote it.  I don't know what it's called.  I don't even WANT to know.  I heard about this cookbook secondhand.  It's probably a great book.  The point is, this cookbook contained LOTS of taco recipes - so many that I think the author may have been scrambling around a bit to reach their goal.  One of my dear sisters ran across a recipe for - get this - spaghetti tacos.  Yes.  Spaghetti with tomato sauce.  In a taco shell.  Ummm . . . really?  My sister and I laughed a bit over a few text messages and kind of left it there.

A few days later, I wanted to come up with something to use some frozen albacore tuna steaks that I had in the freezer.  For some reason, I thought of tacos.  I remembered an awesome recipe for beef tacos with wasabi mayonnaise in Gordon Ramsay's Home Cooking.  This book, by the way, has become one of my favorite cookbooks.  It has awesome, simple recipes, some of which I can even manage on a weeknight!  Here's the book on Amazon.  I've also included a video of Gordon Ramsay making the tacos!


Anyway, I used the recipe as a model, substituting tuna that I lightly smoked in a stovetop smoker (more on that wonderful invention later), and modifying the marinade and slaw recipes a bit.  They were really outstanding!  My husband and I were sitting at the table after dinner, as we often do, and I remembered the spaghetti tacos that I had heard about from my sister.  I mentioned the book and described the recipe to my husband.  He laughed and agreed that the number in the book was exorbitant.  He told me that ten taco recipes was really enough.  What???  Only ten?

No.

I would not even begin to try to come up with the number of tacos in the  mystery book that I still have not read, but I told him that I thought I could come up with one hundred original, interesting, solid taco recipes.  In a year.

It was DONE.  Like I said, it might be my destiny.  I'm not sure yet.

So, there you have it.  That's The Taco Project.  I want to create and share 100 taco recipes with anyone who cares.  It was too late to post my tuna tacos (or at least too late to take pictures), but I figured I would post 99 others and finish up with the tuna tacos at the very end.  My first post for the project was August 2nd, so that means I need to wrap it up with the smoked tuna tacos on August 2nd, 2016.  Well, two down.  Ninety-eight to go.

Since I embarked on this adventure, my husband and I have had a few lively discussions about the nature of tacos.  What constitutes a taco?  When have you taken things too far?  When have you stopped being adventurous and crossed over into not-a-taco territory?  I'm not sure we agree 100% on the answers to those questions.  I suggested that he start his own taco project on his own blog, because that would make the whole thing twice as much fun.  Ha.  :)  I'm not sure that's going to happen.

So, for the purposes of The Taco Project, what is a taco?  Here are MY rules and guidelines for myself.

1.  It has to have a tortilla shaped wrapper (crunchy or soft is fine), and you have to be able to pick it up and eat it like a taco.  No fork food.

2.  It does NOT have to be authentic.  I'm trying to stretch the boundaries with flavors and ingredients, so I will use any ingredients that sound interesting.

3.  I will be exploring a variety of styles and will tackle this project from an omnivorous point of view.  I will try to create a nice sampling of meat, vegetarian (probably some vegan), hearty, light, savory, and sweet tacos.  I am not counting calories or trying to promote a diet or way of eating.  My two goals are creativity and deliciousness.

4.  As you may have noticed (if you have read my recipes), I am not exactly a one-pot or fast-and-easy type of cook.  I wouldn't complicate something for no reason, but I enjoy cooking.  If I need to get three pans and six bowls dirty to bring my idea to life, so be it!

5.  That being said, I will probably have a balance of simpler tacos and those-to-make-when-you-want-to-knock-someone's-socks-off tacos.  I have a full-time job, which I love, and weekday tacos are going to have to be doable for me.  For the majority of the recipes, I will probably use quality store-bought tortillas.  If I have a burst of inspiration and I want to mix it up, I may try a tortilla/wrapper recipe of my own!

Well.  After all this, if I quit, I will really feel silly!  I hope you enjoy reading my recipes, perhaps making a few, and getting some ideas of your own.  I love cooking.  It's . . . really an AMAZING thing to do.  I love to share good food with people who enjoy it.  :)


Wednesday, August 5, 2015

2. Garlic-Ancho Mushroom Tacos with Corn and Avocado Salsa

Yum
Garlic Ancho Mushroom Tacos with Corn and Avocado Salsa Collage

All right, so . . . here we are.  This is taco recipe number two.  I decided to come up with something vegetarian tonight.  Since I seem to be catapulting myself into a new world of taco eclecticism, I thought that I should maintain some variety.  There's more to life than ground beef and cheese, right?  With that in mind, I made some tasty mushroom tacos.  Here's the recipe:

Garlic-Ancho Mushroom Tacos with Corn and Avocado Salsa


Makes 8 generous tacos (4 servings)


Ancho Chiles and Garlic for Mushroom Tacos


Ingredients: 

For the garlic-ancho mushroom filling:


2 dried ancho chiles, stemmed and seeded
¼ cup heavy cream
1 tbsp. olive oil
3 large cloves garlic, peeled and finely chopped
1 lb. crimini mushrooms, larger mushrooms halved or quartered
1 tsp. salt
½ tsp. dried Mexican oregano
Freshly ground pepper to taste

For the corn and avocado salsa:


2 medium ears of corn, shucked
1 large avocado, diced 
½ cup finely chopped red onion
1 jalapeño, seeded and finely chopped
¼ cup chopped cilantro
¼ tsp. ground cumin
½ tsp. salt
¼ tsp. freshly ground pepper
1 tbsp. olive oil, divided
1 tbsp. fresh lime juice

Corn tortillas (The number will vary, depending on how thick they are, whether you double them up and how much filling you prefer.  I bought a pack of 18.)

2 cups fresh spinach leaves, thinly sliced with large stems discarded (It should look a bit like shredded lettuce.)

Sliced Spinach Leaves for Mushroom Tacos

2-3 oz. cotija cheese, crumbled, about ½ cup

1.  Place the chiles in a 2-cup glass liquid measuring cup or similar type of dish.  Cover with boiling water.  Place something (such as a smaller dish) on top of the chiles to weight them down and keep them submerged in the water.  Set aside for 20-30 minutes to soften.  

2.  Cut the corn kernels off the cobs.  Heat 1/2 tbsp. of the oil in a medium skillet over medium heat.  Add the corn kernels and cook them for about 3 minutes, stirring often.  Remove from the heat and set aside to cool completely.

3.  Make the salsa:  place the avocado, onion, jalapeño, cilantro, cumin, salt, pepper, remaining 1/2 tbsp. of oil, and lime juice in a medium bowl.  When the corn has cooled, add it to the bowl and gently combine the ingredients.  Adjust seasonings to taste.  Cover and set aside.  You can refrigerate if you wish, but I prefer the salsa to be at room temperature.

Corn and Avocado Salsa for Mushroom Tacos

4.  Drain and reserve the soaking liquid from the chiles.  In the glass measuring cup, place the softened chiles, the cream, and 1/2 cup of the soaking liquid.  Blend with a hand blender until smooth.  If no hand blender is available, use a food processor or conventional blender.  Set aside.  Reserve the rest of the soaking liquid in case you want to add it to the mushrooms later.

5.  In a large skillet, heat 1 tbsp. of the oil over low heat.  Add the garlic and cook for a couple of  minutes until fragrant.  Add the mushrooms and the salt.


Garlic and Ancho Mushroom Filling for Tacos

raise the heat to medium-low, and cook gently until the mushrooms soften and start to release their juices, about 8-10 minutes.  Add the chile mixture, the oregano, and the pepper and stir to combine.  Simmer gently until the liquid from the sauce has reduced and the mushrooms are tender, about 10 more minutes.  If the sauce reduces too much, you can add some of the reserved soaking liquid.

Garlic Ancho Mushroom Filling for Tacos

6.  While you are cooking the mushrooms, prepare the tortillas to your liking.  There are a few different ways you can do this.  When I am making tacos with soft corn tortillas, I heat a dry cast iron skillet over medium high heat.  I place a large sheet of aluminum foil near the pan.  I heat each tortilla in the skillet for about a minute or so on each side, or until it softens and begins to brown.

Corn Tortilla in a Cast Iron Skillet

After each one is done, I place it on the foil and immediately start the next one.  I stack them on top of one another as I work.  When I'm done with the whole batch, I wrap them completely in the foil and place them in a 250 degree oven until I'm ready to assemble the tacos.  They always stay hot and soft!  I would only heat as many tortillas as you are planning on eating.  You can always heat more tortillas tomorrow for leftovers!

7.  When all of the components are ready, assemble the tacos.  For each taco, place one or two tortillas on a plate.  If the tortillas are thin, as mine were, you should double them up.  Cover the warm tortilla with a small bed of sliced spinach.  Place some of the mushroom mixture on the spinach, wilting it slightly.  Top with the salsa and a sprinkle of crumbled cotija cheese.  Enjoy!  :)


Well, this turned out to be another two-thumbs-up recipe!  If you make it, you'll get a few pans dirty, but the results are worth it! 


These were just a bit messy to eat - not because of the sauce, but because some of the whole mushrooms tended to fall out of the taco.  I suppose you could halve or quarter them all; you would just have to adjust the cooking time a bit since they would cook faster that way.  It didn't bother us.  We didn't have any company, so we just grabbed another napkin or two!  

I don't know that the spinach added much.  I guess I felt that I subconsciously needed to add a leafy green vegetable!  It certainly didn't hurt, but I can't say I tasted it all that much.  It did wilt a bit from the warm tortilla and mushrooms (which was the idea with my assembly order), but not as much as I thought it would.

We'll see how the leftovers are tomorrow.  I'm sure the mushrooms will be fine.  I'm hoping the lime in the salsa will keep the avocado from looking too dismal.  I may have to scrape off the top layer of the salsa, but there is enough left to do that, so hopefully we'll have a great do-over for this recipe, too!  Like my last taco recipe, this is enough for about four hungry people.  It seems like it would be a fun idea to add some sides next time, but we got really full with just the two tacos apiece! 

Thanks for stopping by!  I hope you enjoy reading about or making these!  Well . . . two recipes down, a LOT more to go!  :)


Update:  So, we had the leftovers tonight (8/6).  A few pieces of the avocado did get a little brown.  It was funny - I took a fork and carefully spooned out the browned pieces and set them aside.  Then I thought, "WTH - this is perfectly good avocado!"  I threw them back in, stirred it up, and you couldn't even tell.  Steve said they were even better than yesterday!  :)

Next:  breakfast tacos with mimosas on Sunday morning . . . ???